
Introduction to Mini Cannoli Cups
Why Mini Cannoli Cups are the Perfect Treat?
If you’re in the mood for a delightful dessert that combines tradition with a modern twist, mini cannoli cups are the answer! These bite-sized beauties let you indulge without the commitment of a full-sized cannoli, making them perfect for gatherings or simply satisfying those sweet cravings.
The beauty of mini cannoli cups lies in their versatility. Whether you’re hosting a dinner party, celebrating a birthday, or just looking for a way to treat yourself, these little cups deliver sweetness without overwhelming you with too much indulgence. They’re filled with a rich and creamy filling made from fresh ricotta cheese and cream cheese, combined with a hint of lemon and chocolate chips for added joy.
Moreover, they’re easy to make, thanks to store-bought pie crusts that save time without sacrificing flavor or texture. You can whip up a batch in just 45 minutes, and the air of anticipation as they bake in the oven is truly intoxicating. Plus, the combination of crispy crusts and velvety filling will have everyone coming back for more.
Thinking of hosting a casual get-together? Consider pairing these mini cannoli cups with a selection of coffee and tea. They're sure to impress your guests! For more dessert ideas, check out this guide on sweet alternatives for fresh and exciting recipes.
Ingredients for Mini Cannoli Cups
When it comes to creating delightful mini cannoli cups, you'll want to gather a few key ingredients that come together to create that classic cannoli flavor in a fun, bite-sized format.
Filling Ingredients
- 8 oz ricotta cheese: Creamy and rich, this is the heart of your filling.
- 4 oz cream cheese: Adds a smooth texture and depth of flavor.
- 1 cup powdered sugar: Sweetens the mixture and helps it reach that perfect cannoli sweetness.
- 1 teaspoon vanilla extract: Enhances the overall flavor.
- ½ teaspoon lemon zest: Brightens up the filling.
- 2 teaspoon fresh lemon juice: Adds a zesty kick.
- ½ cup mini chocolate chips: Because who can resist a bit of chocolate?
Cup Ingredients
- 2 store-bought pie crusts: These will form the delicious outer layer of your cups.
- 1 large egg: Beaten for egg wash to get that golden color.
- 2 tablespoon granulated sugar: For that sparkling touch of sweetness.
- 1 teaspoon ground cinnamon: Adds warmth and extra flavor to the crust.
Garnish Ingredients
- Additional mini chocolate chips: For a finishing touch on top.
- Powdered sugar: A light dusting makes everything look more inviting.
With these simple ingredients, you'll be well on your way to impressing your friends at your next gathering! Check out sources like The Spruce Eats for more inspiration on using ingredients in delightful desserts.
Preparing Mini Cannoli Cups
Creating mini cannoli cups is a delightful culinary adventure! With quick prep and easy assembly, you’ll be ready to impress your guests or indulge yourself in sweet satisfaction. Let’s break it down step by step.
Prepping the Oven and Muffin Pans
Before you dive into mixing, ensure your oven is preheated to 375°F. Properly prepping your cooking space is essential—after all, you don’t want to be scrambling at the last minute! Lightly spray two 24-cup mini muffin pans with cooking spray. This will prevent your cute little cups from sticking. A little oil goes a long way in ensuring that your mini cannoli cups come out beautifully shaped and intact.
Draining the Ricotta
Next, let’s focus on the star of the show—the ricotta! To create a rich filling, it's crucial to start with well-drained ricotta cheese. Place 8 oz of ricotta in a cheesecloth or a fine mesh sieve. Squeeze out any excess liquid, which can help avoid a watery filling. If you're using a sieve, gently press down with a rubber spatula to help remove moisture. The drier the ricotta, the creamier your filling will be—guaranteeing that perfect cannoli experience.
Making the Creamy Filling
In a mixing bowl, combine your perfectly drained ricotta with 4 oz of softened cream cheese, 1 cup of powdered sugar, 1 teaspoon vanilla extract, ½ teaspoon of lemon zest, and 2 teaspoon of lemon juice. Using a hand mixer, beat the mixture until it’s creamy and smooth. This is where the magic happens! A fun tip: folding in ½ cup of mini chocolate chips at the end adds delightful little surprises in every bite! Cover your filling and pop it in the fridge to chill a bit while you make the cups.
Creating the Pie Crust Cups
On a lightly floured surface, roll out your 2 store-bought pie crusts. Using a 2-inch round cutter, cut circles from the crust. Gently press each circle into the muffin pan to form a cup shape. You’ll want them snug but not too tight. Brush the insides of each cup with a beaten egg to add that perfect golden color during baking. Mix 2 tablespoon of granulated sugar with 1 teaspoon of ground cinnamon, and sprinkle this delightful concoction over the cups before sliding them into the oven. Bake for about 10-12 minutes until golden brown.
Assembling the Mini Cannoli Cups
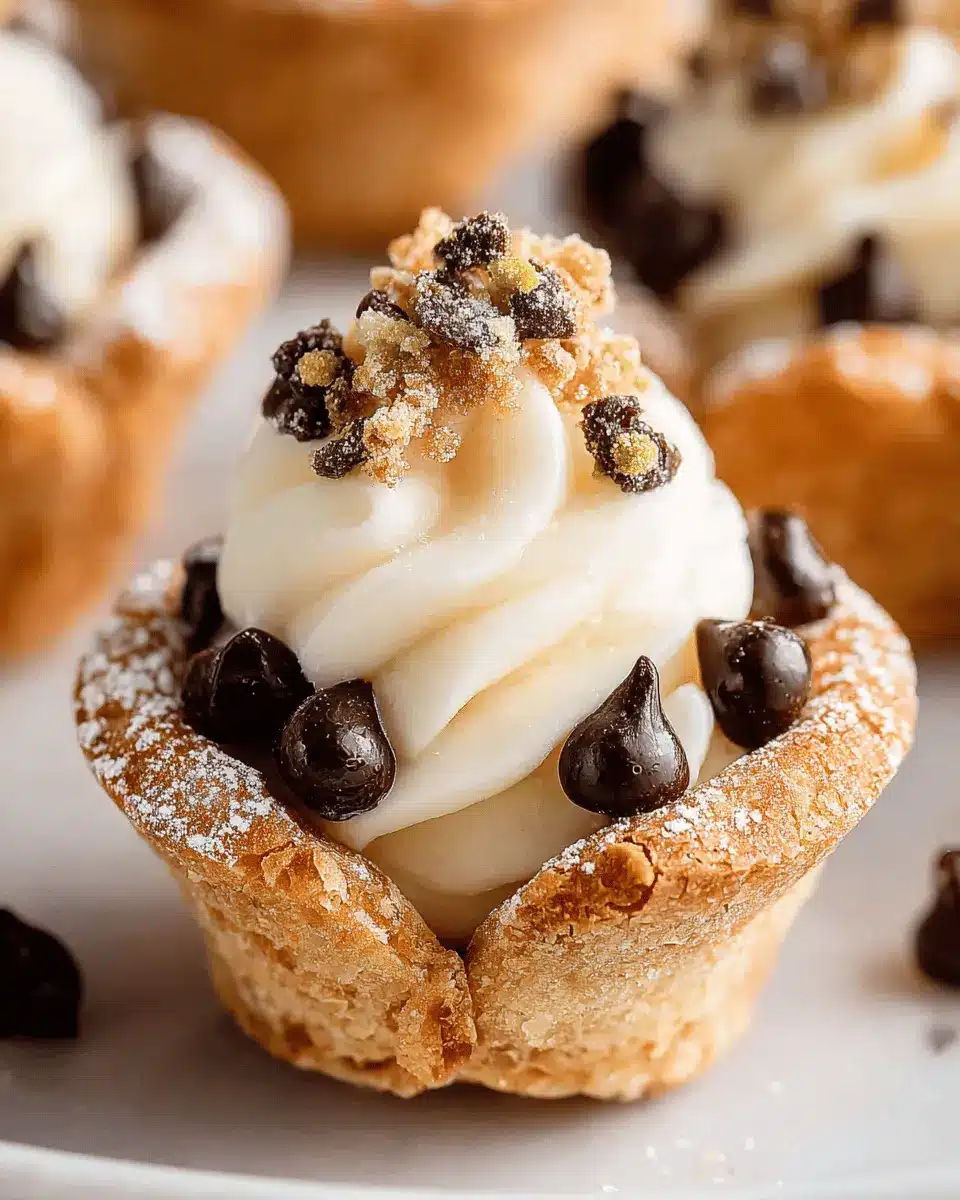
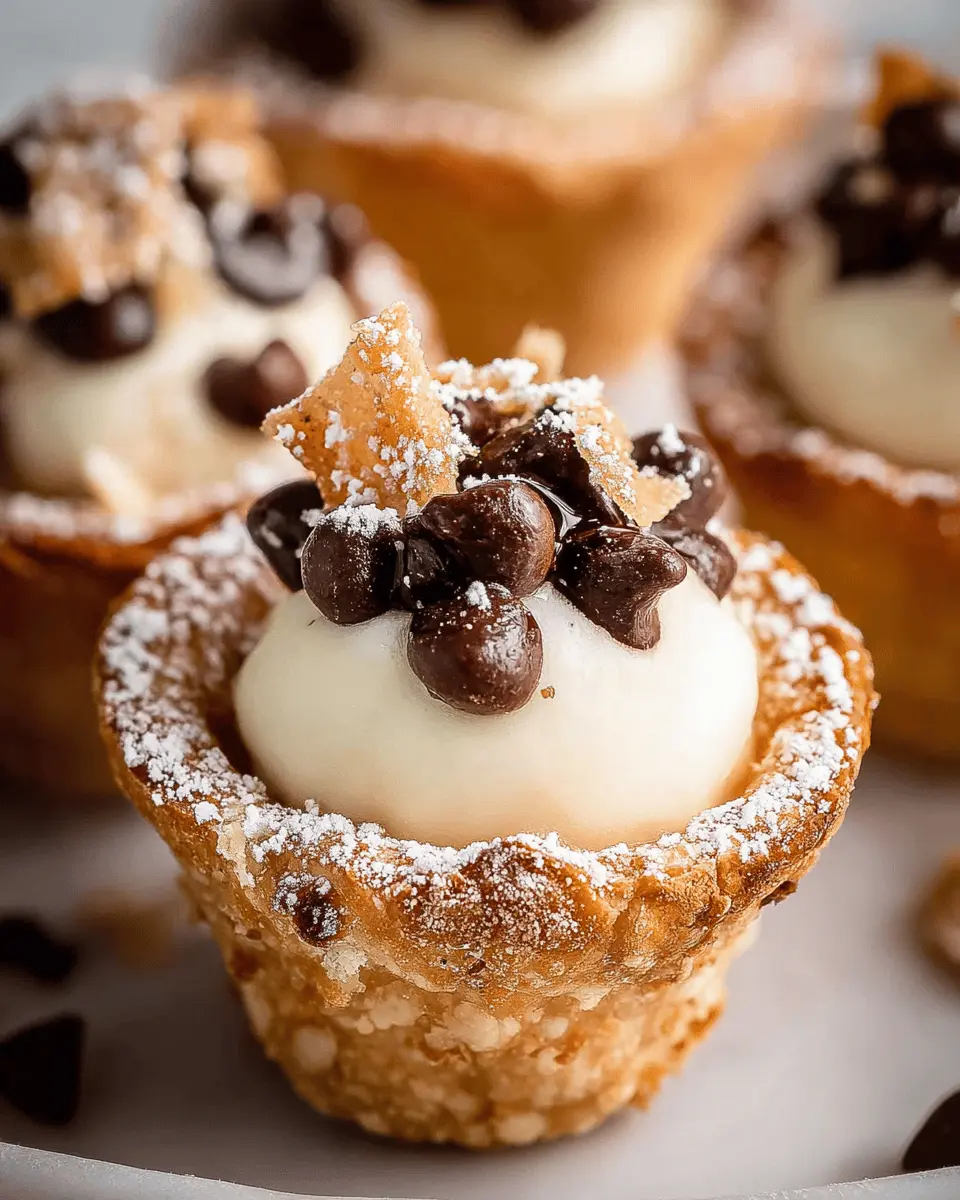
Once your pie crust cups have cooled, it’s time for the fun part—assembly! Fill each cup with the chilled ricotta filling, either using a piping bag or a small spoon. This is your chance to get creative. Top each cup with a few extra chocolate chips for that extra flair, and if you want to impress even more, a light dusting of powdered sugar gives a beautiful finishing touch.
And voilà! You now have gorgeous mini cannoli cups. They’re perfect for any gathering or as a sweet treat just for you! Enjoy the deliciousness and don’t forget to share your bakers’ success story online!

Variations on Mini Cannoli Cups
Chocolate-Dipped Mini Cannoli Cups
Indulge your taste buds with chocolate-dipped mini cannoli cups! Simply melt some chocolate and dip the tops of your filled cups for an extra layer of decadence. You can use dark, milk, or even white chocolate depending on your preference. For a bit of crunch, sprinkle some chopped nuts or crushed cookies on the chocolate before it sets. This delightful twist will have your friends asking for seconds—maybe even thirds!
Fruit-Infused Mini Cannoli Cups
For a refreshing twist, consider making fruit-infused mini cannoli cups. Just fold some finely chopped fruits like strawberries, blueberries, or even mango into the filling for a burst of flavor. The natural sweetness of the fruit will complement the creaminess of the ricotta beautifully. Top them off with a slice of fresh fruit or a drizzle of fruit puree for an attractive finish. These vibrant cups are perfect for a summer gathering or any occasion that calls for a light, fruity dessert!
These variations will surely make your mini cannoli cups the talk of the table. Want more ideas? Check out some additional dessert inspiration here.
Baking Tips for Mini Cannoli Cups
Achieving the Perfect Pie Crust Texture
When crafting your mini cannoli cups, the texture of your pie crust is crucial for that delightful crunch. Here are a few tips to ensure your crust turns out perfectly:
- Chill your ingredients: Use cold butter and water when preparing your crust. This helps to create a flaky texture.
- Don’t overwork the dough: Mix just until combined. Over-kneading can lead to a tough texture—nobody wants that!
- Rolling technique: Roll out your dough on a lightly floured surface to the appropriate thickness, ensuring it holds its shape without being too thick or too thin.
- Bake until golden: Keep an eye on those cups while they bake! A golden hue indicates they're ready, and that’s when the crispiness shines through.
For more comprehensive pie crust tips, check out King Arthur Baking. Happy baking!
Serving Suggestions for Mini Cannoli Cups
Pairing with Fresh Fruit
Elevate your mini cannoli cups by serving them alongside a vibrant mix of fresh fruit. Think ripe strawberries, blueberries, or even zesty citrus slices—these colorful fruits not only look appealing but also add a refreshing contrast to the rich filling. Their natural sweetness complements the silky ricotta filling beautifully, creating a balanced dessert experience that your guests will love.
Enjoying with Coffee or Tea
There’s something special about pairing your mini cannoli cups with a warm beverage. A smooth espresso or a fragrant cup of herbal tea makes for an indulgent treat. The contrasting flavors of your beverage combined with the sweet, creamy cannoli delight will surely make your dessert experience unforgettable. Consider tasting them with a handy guide on the best coffee or tea pairings like this Thrive Market article. It’s all about savoring every bite!
Time Breakdown for Mini Cannoli Cups
Preparation Time
Getting started on your mini cannoli cups takes about 35 minutes. This includes time to prep your ingredients, whip up the creamy filling, and prepare the pastry cups. Don't rush! Enjoy the process—after all, deliciousness can't be hurried.
Cooking Time
Once your cups are ready, you'll only need to bake them for about 10 to 12 minutes. Keep an eye on them as they transform into golden, crispy treats!
Total Time
In just 45 minutes, you can have these delightful mini cannoli cups ready to serve. Perfect for any gathering, they’ll impress your friends and family—guaranteed! If you’re a fan of bite-sized desserts that pack a delightful flavor punch, you’ll want to give this recipe a try.
For further tips on making the best mini desserts, check out resources like Bon Appétit or Serious Eats for inspiration!
Nutritional Facts for Mini Cannoli Cups
Calories per Cup
Each delightful mini cannoli cup contains approximately 79 calories, making them a guilt-free treat that's perfect for satisfying your sweet tooth without overdoing it.
Key Nutritional Information
In addition to being low in calories, these mini cannoli cups offer:
- Carbohydrates: 9g
- Protein: 2g
- Fat: 4g (of which 2g is saturated)
- Sugar: 8g
Rich in flavors and textures, they’re a wonderful option for dessert lovers looking for a delicious yet manageable portion. For more on balanced desserts, check out resources like the Harvard Health Eating Plate, which emphasizes the importance of moderation and a healthy balance in your diet.
FAQs about Mini Cannoli Cups
Can I make these mini cannoli cups ahead of time?
Absolutely! One of the great things about these mini cannoli cups is that you can prepare the filling a day in advance and store it in the fridge. Just wait to assemble the cups until you're ready to serve, as this keeps the crusts nice and crispy.
What if I can't find mini chocolate chips?
No worries! If mini chocolate chips aren’t available, you can chop regular chocolate chips into smaller pieces or even use a different mix-in, like crushed pistachios or finely chopped dried fruit. Each variation adds its own unique flair to your mini cannoli cups.
How should I store leftover mini cannoli cups?
If you have leftovers, store them in an airtight container in the refrigerator for up to 2 days. However, keep in mind that the crust may lose some crispiness over time. If you've filled them, I suggest enjoying them fresh whenever possible for the best texture and flavor.
Conclusion on Mini Cannoli Cups
Recapping the Joy of Homemade Treats
In conclusion, putting together these delightful mini cannoli cups brings the joy of homemade treats to your kitchen with minimal effort. Each bite is a delightful fusion of creamy filling and crispy crust, perfect for any gathering. Enjoy sharing—and indulging—in these sweet bites!

Mini Cannoli Cups
Equipment
- mini muffin pans
- mixing bowl
- hand mixer
- rubber spatula
- 2 inch round cutter
- Pastry Brush
Ingredients
Filling
- 8 oz ricotta cheese
- 4 oz cream cheese softened to room temperature
- 1 cup powdered sugar whisked to remove any lumps
- 1 teaspoon vanilla extract
- 0.5 teaspoon lemon zest
- 2 teaspoon lemon juice fresh is best
- 0.5 cup mini chocolate chips
Cups
- 1 large egg beaten
- 2 tablespoon granulated sugar
- 1 teaspoon ground cinnamon
Garnish
- additional mini chocolate chips
- additional powdered sugar for dusting
Instructions
Prepare
- Preheat oven to 375°F. Lightly spray two 24 cup mini muffin pans with cooking spray and set aside.
Drain ricotta
- Add 8 oz ricotta cheese to a cheesecloth (or a fine mesh sieve), and squeeze out the excess water. For a sieve, gently press down with a rubber spatula to remove the water.
Make filling
- To a mixing bowl, add the drained ricotta, 4 oz cream cheese, 1 cup powdered sugar, 1 teaspoon vanilla extract, ½ teaspoon lemon zest, and 2 teaspoon lemon juice.
- Use a hand mixer to beat until combined and creamy. Then use a rubber spatula to fold in ½ cup mini chocolate chips.
- Cover and refrigerate.
Make cups
- On a lightly floured surface, roll out 2 store-bought pie crusts. Use a 2 inch round cutter (like a cookie cutter or biscuit cutter - or even the rim of a drinking glass), to cut out circles from the crust.
- Gently press each circle into the muffin pan, forming a cup shape.
- Use a pastry brush to coat the insides of the cups with 1 large egg that's been beaten with a fork.
- Combine 2 tablespoon granulated sugar and 1 teaspoon ground cinnamon and sprinkle over the cups.
- Bake in preheated oven for 10-12 minutes, until golden brown and crispy.
- Remove from oven and let cool completely in the pan before removing.
Assemble
- Once the pie crusts are cooled, fill each cup with the ricotta filling (by using a piping bag or small spoon).
Garnish and serve
- Add a few extra chocolate chips to each cannoli cup and dust with powdered sugar. Serve and enjoy!
Leave a Reply