
Introduction to Banana Pudding
When it comes to comfort food, few desserts can rival the beloved appeal of banana pudding. This classic dish, with its creamy layers of banana, vanilla, and crunchy wafers, evokes a sense of nostalgia that many of us cherish. Growing up, I remember my grandmother would whip up a batch for family gatherings, and the aroma alone was enough to spark excitement.
Why Banana Pudding is the Ultimate Comfort Food
So, why does banana pudding hold such a special place in our hearts? For starters, it’s the perfect combination of textures and flavors. The velvety pudding, sweet banana slices, and crispy vanilla wafers create a delightful harmony that keeps you coming back for more. Additionally, it’s incredibly versatile—perfect for summer picnics or cozy gatherings with friends.
In fact, according to the American Pie Council, desserts like banana pudding consistently rank among America’s favorites. And there’s no mystery why! It's easy to make and uses simple ingredients that you likely have on hand. With a few layers of love, you can create this iconic dessert that’s sure to impress.
Ready to embark on your banana pudding journey? Let’s dive into the recipe!
Ingredients for Banana Pudding
Essential Ingredients for a Classic Banana Pudding
Creating a delightful banana pudding starts with a few essential ingredients. Here’s what you’ll need to whip up this comforting dessert:
- 1 (14-oz.) can sweetened condensed milk – Adds rich, creamy sweetness.
- 1 ⅓ cups whole milk – Vital for achieving that classic pudding texture.
- 1 (5.1-oz.) package instant vanilla pudding mix – The core of your pudding base.
- 3 cups heavy cream – For that luscious, whipped topping.
- 1 tsp. pure vanilla extract – A hint of vanilla enhances the flavors.
- 1 (12-oz.) box vanilla wafer cookies – These provide the perfect crunch and layer.
- 4 bananas, sliced into coins – Fresh bananas are a must for that signature taste.
- 2 tsp. granulated sugar – To sweeten the whipped cream topping.
For a thorough ingredient list, consider this guide on banana pudding variations.
Optional Mix-ins and Toppings
Feel free to get creative! Here are some optional mix-ins and toppings that can elevate your banana pudding experience:
- Chopped nuts – Walnuts or pecans add an excellent crunch.
- Chocolate chips or shavings – For chocolate lovers looking to indulge.
- Toasted coconut flakes – A tropical twist that pairs wonderfully with bananas.
- Caramel sauce – Drizzle it over the layers for added sweetness.
Explore these variations to make your banana pudding uniquely yours!
Preparing Banana Pudding
Creating a delightful banana pudding from scratch is not just a recipe but a delicious experience that brings joy to any gathering. Let’s dive into the steps to prepare this classic dessert that will have your friends and family coming back for seconds!
Whip Up the Pudding Mixture
Start by gathering your ingredients: sweetened condensed milk, whole milk, and instant vanilla pudding mix. In a large bowl, combine these three ingredients and whisk them together vigorously until the mixture is smooth. Don’t forget to break up any lumps—you want that pudding to be silky! Once you've achieved a lovely consistency, pop it in the refrigerator for about five minutes to set. This is also a good time to brew a cup of coffee or tea to enjoy while you wait!
Prepare the Whipped Cream
While your pudding mixture is chilling, it’s time to create that fluffy, airy whipped cream that will take your banana pudding to the next level. Grab another large bowl and, using a handheld mixer, beat three cups of heavy cream along with a teaspoon of pure vanilla extract. Beat at medium-high speed for about two to three minutes, or until you see stiff peaks forming. This is a crucial step for texture! Set aside half of this whipped cream for serving later—this keeps it airy and adds a lovely finishing touch to your dessert.
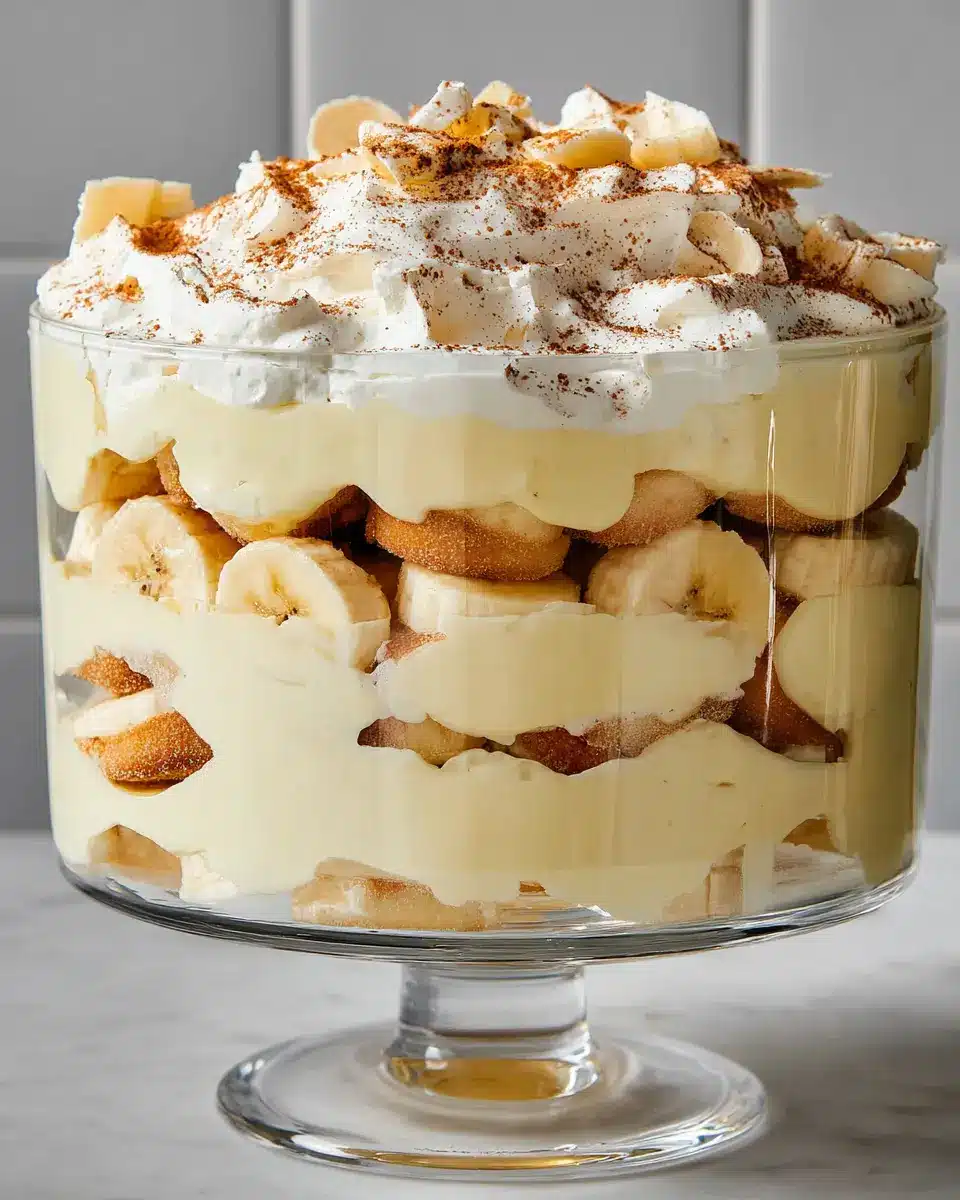
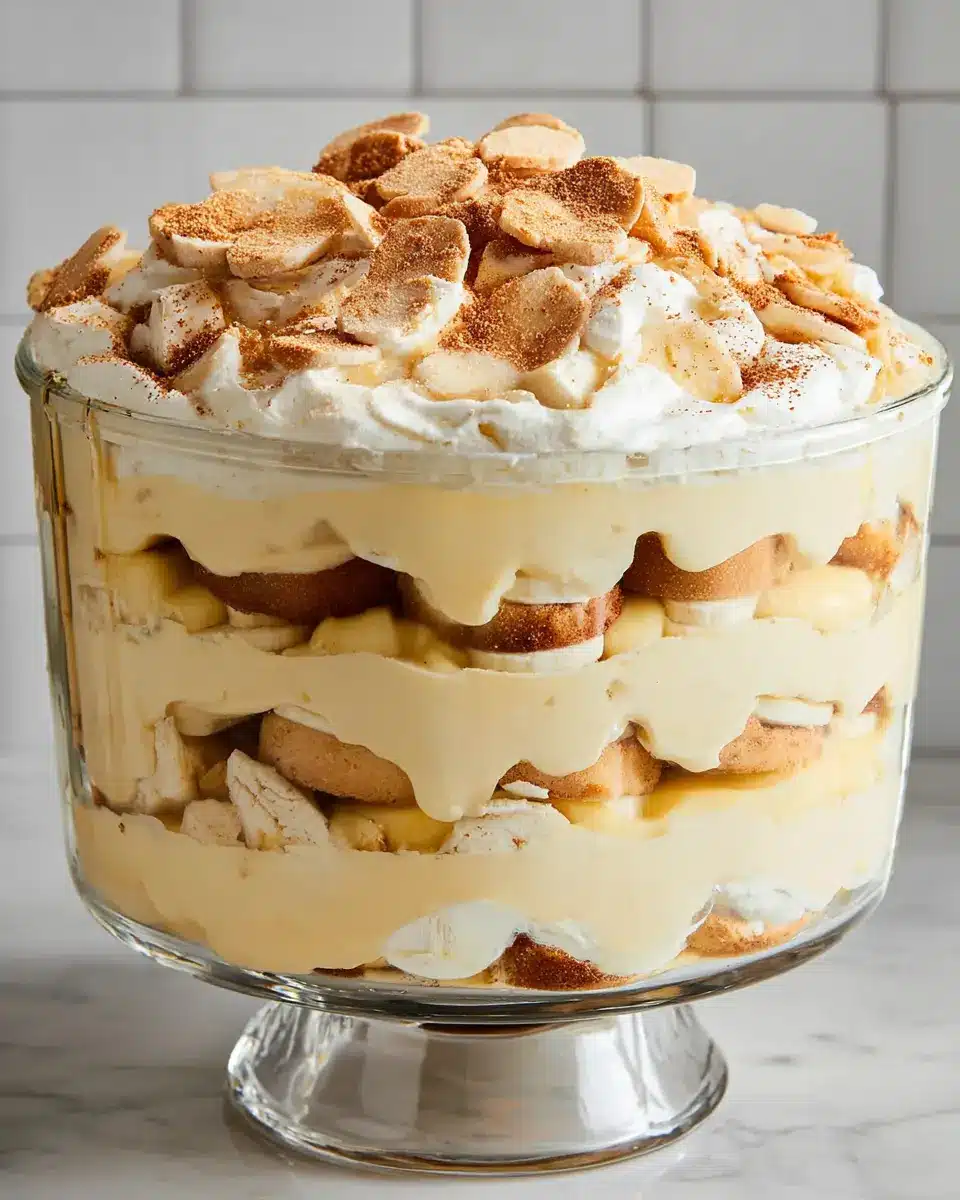
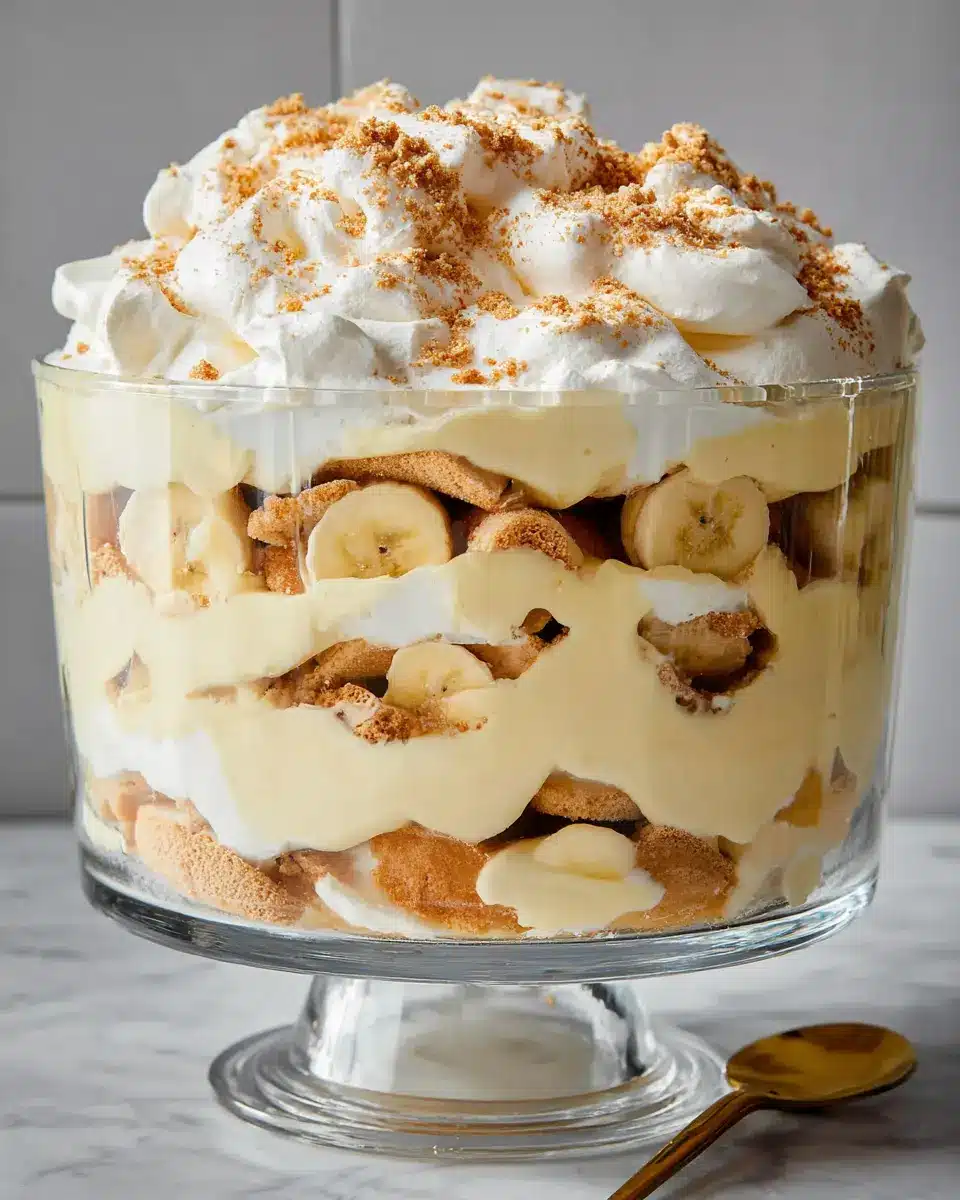
Assemble the Layers
Now comes the fun part—assembling your banana pudding! Grab your trifle dish and cover the bottom with a layer of vanilla wafer cookies, which brings a delightful crunch. Spoon one-third of that luscious pudding mixture over the wafers, followed by another layer of wafers. Here’s where the bananas come in: slice about four ripe bananas and layer them evenly over the pudding. Repeat this layering process until you reach the top of the dish, finishing with a final layer of pudding. Feel free to get creative here—maybe even add a few extra banana slices on top for a pop of freshness!
Let It Chill
After assembling your masterpiece, cover the dish with plastic wrap or a lid and refrigerate for at least three hours, or even overnight if you can wait. This chilling time allows the flavors to meld beautifully and the layers to set perfectly, ensuring that your banana pudding is both delicious and stable.
Add Finishing Touches
Before serving, give that reserved whipped cream a sprinkle of granulated sugar and stir it in—this adds a touch of sweetness. Dollop the whipped cream generously on top of your pudding, and remember the reserved wafers? Crumble them up and sprinkle over the whipped cream to create a nice textured finish. Your banana pudding is now ready to shine at your next gathering or family meal.
Enjoy every creamy, dreamy bite! For tips on other desserts, check out this article on classic sweets, perfect for your next get-together.
Variations on Banana Pudding
Looking to mix things up with your banana pudding? Here are some delicious variations that cater to different tastes!
Chocolate Banana Pudding
If you’re a chocolate lover, add cocoa powder to the pudding mix or swirl in melted chocolate for a rich twist. Top with chocolate cookie crumbles instead of vanilla wafers for that extra indulgence.
Tropical Banana Pudding
For a fruity escape, try incorporating fresh pineapple or coconut flakes into your banana pudding. You can even use coconut milk in place of whole milk for a refreshing tropical twist that transports you straight to the beach!
Vegan Banana Pudding
Plant-based eaters can whip up a vegan version using almond or oat milk and a vegan pudding mix. Substitute whipped coconut cream for heavy cream and enjoy a delicious, dairy-free treat that everyone will love!
By trying these variations, you’re sure to impress at your next gathering! Interested in exploring more twists on classic recipes? Check out this fantastic resource for unique dessert ideas!
Cooking Tips and Notes for Banana Pudding
Choosing the Ripest Bananas
When it comes to making the ultimate banana pudding, selecting the right bananas is key. Look for bananas that are fully ripe, with a bright yellow color and a few brown speckles. These bananas bring out the sweetest flavor and creaminess in your dessert. For an extra tip, if you prefer a hint of tanginess, opt for slightly underripe bananas; they provide a nice balance to the pudding's richness.
Storing Leftovers
If you happen to have leftover banana pudding, store it in an airtight container in the fridge for up to three days. To prevent the bananas from browning, you can add a squeeze of lemon juice over the top. This not only keeps them fresh but also adds a lovely zing to your dessert! For more storage tips, check out this informative guide on Food Storage.
Serving Suggestions for Banana Pudding
Pairing with Fresh Fruits
Elevate your banana pudding by serving it with an assortment of fresh fruits. Slices of strawberries, blueberries, or even kiwi not only add a burst of color but also enhance the flavor profile. The tartness of these fruits complements the creaminess of the pudding, creating a delightful contrast and a more refreshing dessert experience.
Creative Presentation Ideas
Presenting your banana pudding in individual cups or jars can make a charming addition to any gathering. Simply layer the pudding with wafers and bananas in clear glass containers for an eye-catching effect. Top each serving with a dollop of whipped cream and a sprinkle of crushed wafers. It’s a simple way to impress your guests while making it easy to serve!
For more tips on serving desserts, check out this handy guide.
Time Breakdown for Banana Pudding
Preparation time
Getting ready to whip up this delicious banana pudding requires about 25 minutes. You'll want to gather your ingredients and equipment, ensuring everything is in order for a smooth cooking experience.
Chilling time
After layering your banana pudding, it's essential to let it chill for at least 3 hours. This allows the flavors to meld and the texture to set perfectly. For the best results, feel free to let it chill overnight!
Total time
All in all, from start to serving, you’ll need around 3 hours and 25 minutes. But trust me, this delightful dessert is well worth the wait! For more tips on perfecting your pudding, check out this guide on dessert chilling techniques.
Nutritional Facts for Banana Pudding
Calories per serving
Each serving of this delightful banana pudding contains approximately 655 calories. Perfect for a special treat, it's a dish that blends indulgence with nostalgia.
Main Nutritional Components
This beloved dessert is packed with various essential nutrients. Each serving comprises:
- Fat: Mainly from heavy cream, contributing to its luscious texture.
- Carbohydrates: Providing energy, primarily from vanilla wafer cookies and bananas.
- Protein: Sourced from milk and cream, making it a richer option.
For more detailed nutritional insights, consider visiting resources like CalorieKing or NutritionData to track your overall health and wellness while enjoying your favorite treats!
FAQs about Banana Pudding
Can I make banana pudding ahead of time?
Absolutely! One of the best things about banana pudding is that it actually tastes better after it sits for a few hours. You can prepare your banana pudding a day in advance and let it chill in the refrigerator. Just be sure to add the bananas close to serving time to maintain their freshness.
How do I prevent the bananas from browning?
To keep your bananas looking fresh in your banana pudding, you can toss the sliced bananas in a little lemon juice or pineapple juice. This acidity helps slow down the browning process. Additionally, layering the bananas between pudding and wafers also provides a barrier that can protect them.
What are some common substitutions?
If you’re looking to get creative with your banana pudding, consider these substitutions:
- Milk Alternatives: Use almond milk or oat milk for a dairy-free version.
- Cookie Options: Swap vanilla wafers for graham crackers or even chocolate wafer cookies for a twist.
- Sweetener: You can replace granulated sugar with honey or maple syrup for a natural sweetener kick.
For more tips and information on this beloved dessert, check out Serious Eats for variations and creative ideas.
Conclusion on Banana Pudding
Why You Should Try Making Banana Pudding at Home
Creating your own banana pudding is both fun and rewarding. With simple ingredients and steps, you can whip up a delightful dessert that brings warmth and nostalgia to any gathering. Plus, homemade versions taste far superior to store-bought, making it a perfect treat for friends and family. So grab your ingredients and start mixing!

Banana Pudding
Equipment
- 3-quart trifle dish
Ingredients
- 1 14-oz. can sweetened condensed milk
- 1.33 cups whole milk
- 1 5.1-oz. package instant vanilla pudding mix
- 3 cups heavy cream
- 1 tsp. pure vanilla extract
- 1 12-oz. box vanilla wafer cookies
- 4 bananas, sliced into coins
- 2 tsp. granulated sugar
Instructions
- In a large bowl, whisk condensed milk, whole milk, and pudding mix, breaking up any lumps. Refrigerate until set, about 5 minutes.
- Meanwhile, in another large bowl, using a handheld mixer on medium-high speed, beat cream and vanilla until stiff peaks form, 2 to 3 minutes. Set aside half of whipped cream for serving. Fold remaining whipped cream into milk mixture.
- Cover bottom of 3-quart trifle dish with wafers. Top with one-third of pudding mixture. Cover with another layer of wafers. Top with an even layer of banana slices. Continue to layer pudding, wafers, and bananas until you reach the top, ending with a final layer of pudding. Set aside remaining wafers for serving.
- Refrigerate at least 3 hours or up to overnight.
- Add granulated sugar to reserved whipped cream and stir to combine. Dollop on top of banana pudding. Crumble reserved wafers, then sprinkle over pudding.

Leave a Reply