
Introduction to Black Forest Ice Cream Cake
Why Black Forest Ice Cream Cake is the Ultimate Dessert
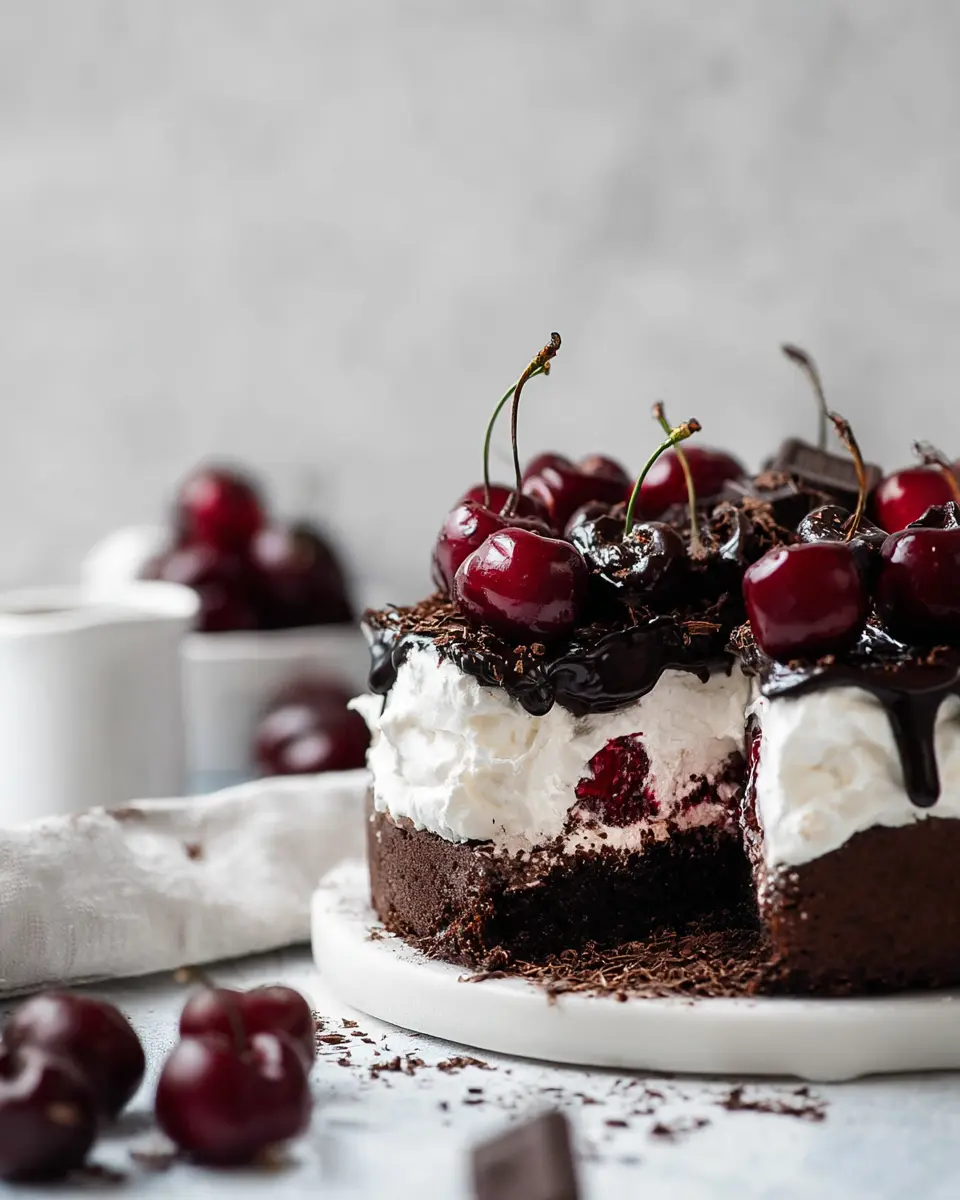
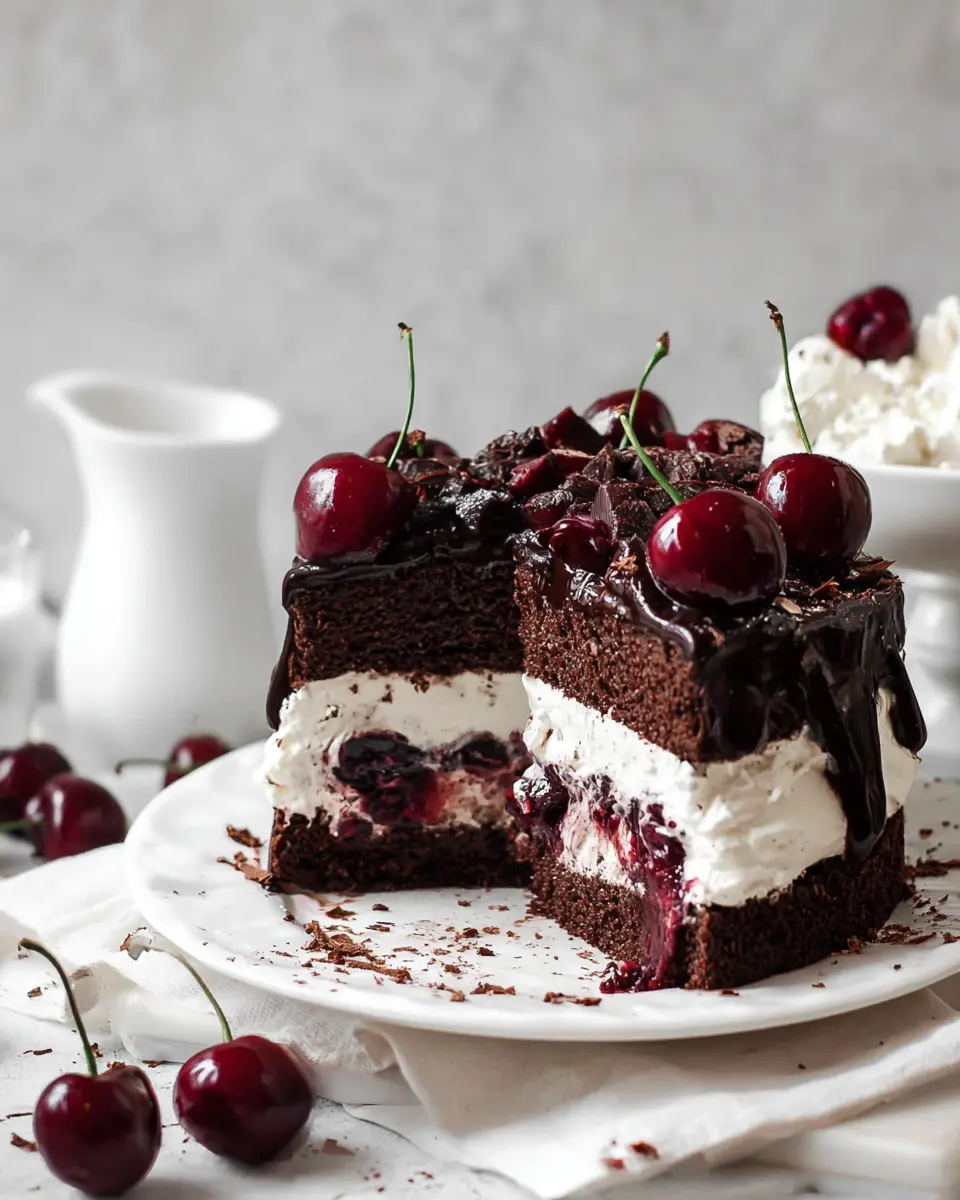
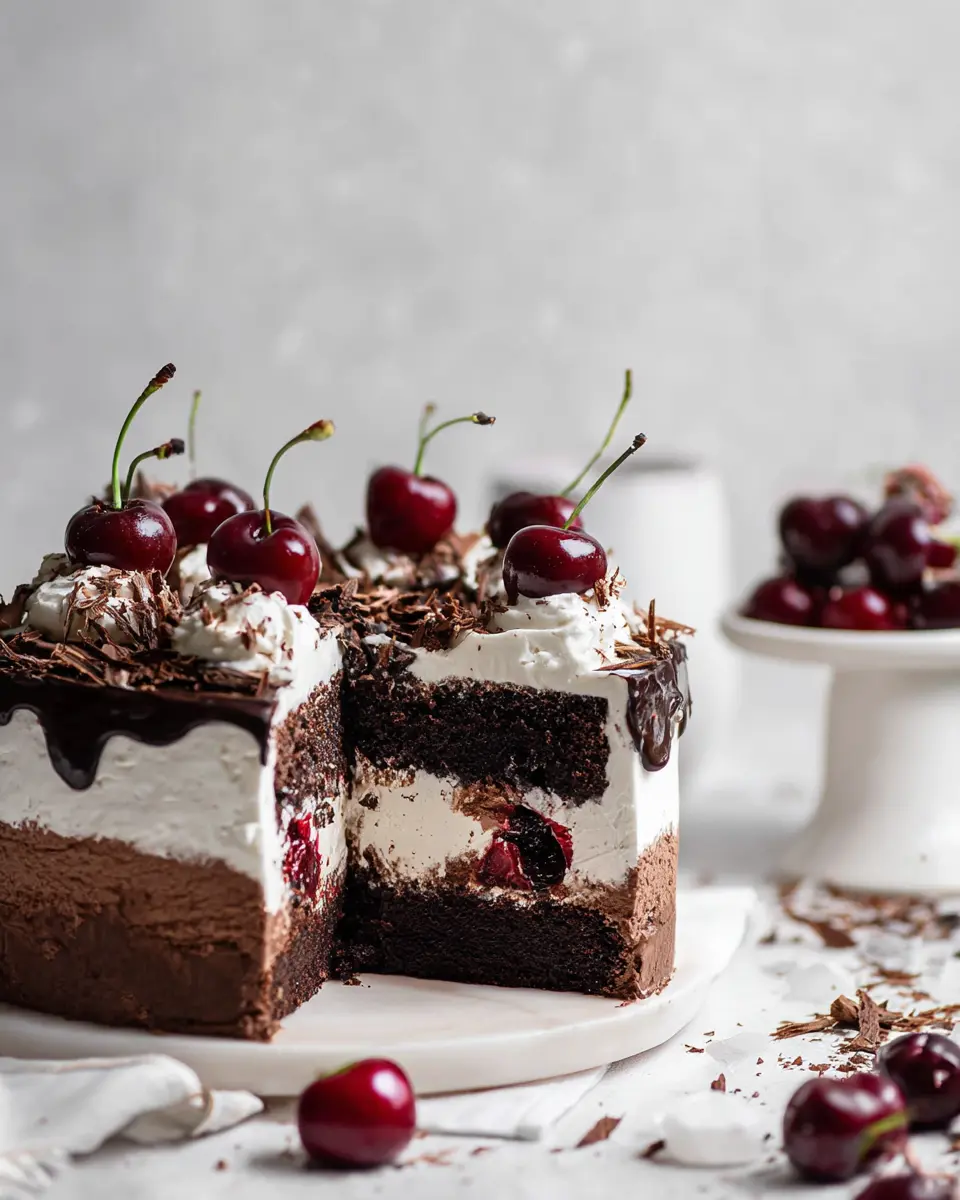
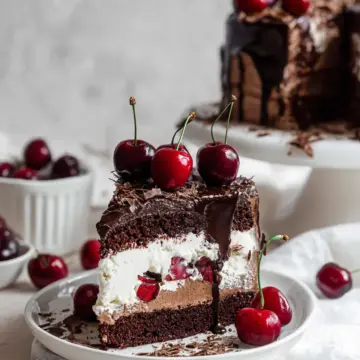
If you're on the lookout for a show-stopping dessert, look no further than Black Forest Ice Cream Cake. This delightful concoction brings together layers of rich brownie, luscious cherry sauce, and creamy vanilla ice cream, creating a delightful fusion of textures and flavors.
What makes this cake a true favorite? The combination of sweet cherries with a hint of chocolate and the refreshing chill of ice cream makes every bite is an experience. Whether you’re celebrating a special occasion or just want to indulge on a weekday, this dessert fits perfectly! Moreover, it’s customizable – you can easily swap the cherries for your favorite fruits or top it with various chocolates to suit your palate.
The beautiful contrast of the deep chocolate and bright cherry colors adds an eye-catching flair, making it a perfect centerpiece for gatherings. Plus, the preparation can be a fun weekend project, allowing you to channel your inner baker without feeling rushed.
Ready to impress your friends and family? Dive into the recipe and discover how to create your own Black Forest Ice Cream Cake! It’s sure to become a go-to dessert for any occasion.
For tips on how to select the best cherries, check out this resource from Healthline.
Ingredients for Black Forest Ice Cream Cake
Creating a delightful Black Forest Ice Cream Cake is about gathering the right ingredients that bring each layer to life. Here’s a breakdown to help you get started.
Cherry Sauce Components
To craft a luscious cherry sauce, you’ll need:
- 1 cup cherries (fresh or frozen)
- 2 tablespoons granulated sugar
- 1 tablespoon cornstarch
- 2 tablespoons water
- 1 tablespoon Kirsch or cherry juice as a non-alcoholic substitute
This sweet and tangy sauce serves as a perfect complement to the cake layers.
Brownie Layer Essentials
For a rich brownie layer, gather:
- ½ cup unsalted butter, melted
- ¾ cup light brown sugar
- ½ cup granulated sugar
- 2 large eggs, at room temperature
- 2 tablespoons Kirsch (or cherry juice)
- 1 teaspoon vanilla extract
- ¾ cup unsweetened cocoa powder
- ⅓ cup all-purpose flour
- ½ teaspoon espresso powder (optional)
- ¼ teaspoon kosher salt
This combination ensures a decadent base for your cake that balances beautifully with the ice cream.
Chocolate Ganache Ingredients
To finish with a rich chocolate ganache, you will need:
- 4 ounces dark chocolate, chopped
- ½ cup heavy cream
This glossy ganache adds a luxurious touch to your Black Forest Ice Cream Cake.
Topping Requirements
Finally, for the dreamy topping:
- 3 cups vanilla ice cream
- Fresh cherries for garnish
- Chocolate shavings to create that elegant finish
Once you have these ingredients ready, you're well on your way to crafting a show-stopping dessert that will impress friends and family alike!
Step-by-Step Preparation of Black Forest Ice Cream Cake
Making a delightful Black Forest Ice Cream Cake is not just about following a recipe; it's an experience filled with creativity and love! Let's dive into the step-by-step preparation so you can impress your friends and family with this delicious treat.
Make the Cherry Sauce
The cherry sauce is a fundamental part of the Black Forest Ice Cream Cake, providing that signature tart sweetness. Start by adding 1 cup of cherries (fresh or frozen) and 2 tablespoons of granulated sugar into a large pot. Heat it over medium until the cherries start breaking down into a syrupy mixture; this is where the magic begins!
Next, dissolve 1 tablespoon of cornstarch in 2 tablespoons of water and add it to the cherries. Stir until the filling thickens beautifully. Don’t forget to mix in 1 tablespoon of Kirsch for extra depth in flavor, then remove it from the heat and let it cool completely.
Prepare the Brownie Layer
For the brownie layer, preheat your oven to 350°F and line a 6-inch round cake pan with parchment paper. In a mixing bowl, whisk together ½ cup of melted unsalted butter, ¾ cup of light brown sugar, and ½ cup of granulated sugar. Adding 2 large eggs one at a time will ensure a smoother batter.
Mix in 2 tablespoons of Kirsch and 1 teaspoon of vanilla extract for added richness, then carefully fold in ¾ cup of unsweetened cocoa powder and the remaining dry ingredients. Pour this luscious batter into your prepared pan and bake for 25-35 minutes. Let the brownie layer cool in the pan completely before the next step.
Create the Chocolate Ganache
Once your brownie has cooled, it’s time to whip up the chocolate ganache. Chop 4 ounces of dark chocolate and place it in a large bowl. Heat ½ cup of heavy cream in the microwave until it's hot (1-2 minutes). Pour it over the chocolate and let it sit for about two minutes before mixing gently until fully combined. This rich ganache will provide a gorgeous finish to your cake!
Assemble the Ice Cream Layer
Line the same 6-inch round cake pan with plastic wrap. Now, add about 3 cups of slightly softened vanilla ice cream to the pan, pressing it evenly. Cover this layer and freeze for at least 2 hours, preferably overnight, to set it properly.
Combine All Layers and Freeze
After everything is set, spread your cooled cherry sauce evenly over the brownie layer, then freeze again for 2 hours until firm. When you’re ready to assemble, place the brownie and cherry layers on your serving plate, then top it with the frozen ice cream layer. Pour the cooled ganache over the top, gently pushing some to the edges for a drippy effect.
Finally, pop the Black Forest Ice Cream Cake back in the freezer for at least 30 minutes. Decorate with fresh cherries and chocolate shavings when you’re ready to serve.
And there you have it! An impressive dessert that’s sure to wow your guests! Enjoy the sweet success of your baking!
Variations on Black Forest Ice Cream Cake
Creating unique twists on the classic Black Forest Ice Cream Cake can elevate your dessert game. Here are two delightful variations to try:
Dark Chocolate and Raspberry Variation
For a bolder take, swap regular chocolate layers for rich dark chocolate cake. Add a layer of fresh raspberries or raspberry sauce to enhance the flavor profile. This variation brings a tartness that beautifully contrasts the sweetness of traditional cherry filling, making each bite a burst of exciting flavors.
Nutty Brownie Alternative
Craving something a bit different? Replace the standard brownie base with nutty brownies—think walnuts or hazelnuts mixed right into the batter. This adds a delightful crunch and a hint of nuttiness that compliments the creaminess of the ice cream, creating a deliciously textured Black Forest Ice Cream Cake that you and your guests will adore.
Feel free to get creative with these options and enjoy experimenting!
Cooking Tips and Notes for Black Forest Ice Cream Cake
Ingredient Swaps and Adjustments
Feeling adventurous? You can easily customize your Black Forest Ice Cream Cake by swapping ingredients! Consider using almond extract instead of vanilla for a nutty twist or opt for maple syrup instead of granulated sugar for a richer flavor. If cherries are out of season, any tart berry can bring a delightful taste, like raspberries or blackberries.
Storage Suggestions
To keep your Black Forest Ice Cream Cake fresh, store it in an airtight container in the freezer. It will last for up to a week. Just remember to take it out 10-15 minutes before serving for easy slicing. If you anticipate leftovers, you can keep the ganache separate to avoid sogginess. Enjoy this scrumptious treat any time!
Serving Suggestions for Black Forest Ice Cream Cake
Plating Ideas
Elevate your Black Forest Ice Cream Cake with stunning plating. Use a cake stand for a dramatic presentation or a simple white plate to let the cake’s rich colors shine. Consider serving slices alongside a small scoop of extra vanilla ice cream or a drizzle of homemade cherry sauce for added flair. Finish it with a sprig of mint for a pop of color.
Perfect Pairings
For beverages, a rich and creamy coffee or a refreshing iced tea pairs beautifully with this cake. If you’re looking for something a little more festive, try non-alcoholic sparkling juice for a celebratory touch. Remember, the key to a perfect dessert experience is balance—sweetness paired with contrasting flavors makes every bite delightful!
Time Breakdown for Black Forest Ice Cream Cake
Preparation Time
The preparation for your delightful Black Forest Ice Cream Cake takes about 30 minutes. This includes the time spent creating the cherry sauce, brownie layer, and preparing the cream for the ganache.
Cooking Time
When it comes to cooking, you'll need approximately 25-35 minutes for baking the brownie layer. Keep an eye on it to ensure it’s perfectly baked, just until the knife comes out mostly clean.
Total Time
In total, the process will sum up to around 4–5 hours, considering the chilling and freezing times required for layers to set properly. Make sure to plan ahead to enjoy this tasty treat at your next gathering!
For more tips on timing your baking, check out this guide on the importance of prep to streamline your kitchen workflow.
Nutritional Facts for Black Forest Ice Cream Cake
When indulging in a slice of Black Forest Ice Cream Cake, it's good to know what you're treating yourself to. Here's a quick breakdown:
Calories per Serving
Each serving of this decadent cake contains approximately 320 calories, making it a delightful dessert option for special occasions.
Carbohydrates
With about 40 grams of carbohydrates per slice, this cake balances its rich, chocolatey flavor with a satisfying sweetness from the included ice cream and cherry sauce.
Protein
You'll also enjoy around 4 grams of protein in a serving, courtesy of the brownie layer and ice cream. This slight protein boost can help you feel a bit more satisfied after your treat!
Remember, while this dessert is certainly rich and delicious, moderation is key. Enjoy it while making lovely memories with friends and family! If you're curious about healthy dessert alternatives, check out Healthline's guide for some inspiration.
FAQs about Black Forest Ice Cream Cake
Can I use store-bought ice cream for this cake?
Absolutely! Store-bought ice cream can save you time without sacrificing flavor. Just choose a high-quality vanilla ice cream for the best results. Some people even like to mix different flavors—don’t hesitate to get creative!
How long will this cake last in the freezer?
When properly wrapped, your Black Forest Ice Cream Cake can last in the freezer for up to one month. However, for optimal taste and texture, try to enjoy it within two weeks. Remember to cover it well to prevent freezer burn!
What can I substitute for Kirsch?
If you prefer to omit Kirsch, consider using cherry juice or syrup for a non-alcoholic alternative. You could also add a splash of almond extract for a nutty twist. Just be mindful of the flavors to ensure they complement your cake.
For more tips on cake storage and substitutions, check out this guide. Enjoy creating your delicious masterpiece!
Conclusion on Black Forest Ice Cream Cake
Indulging in Black Forest Ice Cream Cake is an experience you won’t soon forget. The rich brownie, creamy ice cream, and luscious cherry filling create a delightful harmony of flavors and textures. Whether for a celebration or just a cozy night in, this cake is a must-try!
Black Forest Ice Cream Cake
Equipment
- 6-inch round cake pan
- large pot
- microwave safe bowl
- spatula
- Whisk
- Plastic Wrap
Ingredients
Cherry Sauce
- 1 cup cherries, fresh or frozen
- 2 tablespoons granulated sugar
- 1 tablespoon cornstarch
- 2 tablespoons water
- 1 tablespoon Kirsch
Brownie Layer
- ½ cup unsalted butter, melted
- ¾ cup light brown sugar
- ½ cup granulated sugar
- 2 large eggs, room temperature
- 2 tablespoons Kirsch
- 1 teaspoon vanilla extract
- ¾ cup unsweetened cocoa powder
- ⅓ cup all purpose flour
- ½ teaspoon espresso powder, optional
- ¼ teaspoon kosher salt
Chocolate Ganache
- 4 ounces dark chocolate, chopped
- ½ cup heavy cream
Topping
- 3 cups vanilla ice cream
- fresh cherries
- chocolate shavings
Instructions
Cherry Sauce
- Add the cherries and sugar to a large pot.
- Heat over medium heat until the cherries begin to break down and get syrupy.
- Dissolve the cornstarch in water, then add to the cherries and stir until the filling thickens. Then stir in the Kirsch.
- Remove from the heat and let cool completely to room temperature.
Brownie Layer
- Preheat the oven to 350°F and line a 6 inch round cake pan with parchment paper on the bottom and sides.
- In a large bowl, whisk together the melted butter, brown sugar, and granulated sugar.
- Add in the eggs one at a time and whisk each one until fully incorporated and the batter starts to get lighter in color.
- Then add in the Kirsch and vanilla extract and mix until smooth.
- Fold in the cocoa powder, espresso powder, flour, and salt and mix until the batter is just combined.
- Pour the batter into the prepared cake pan.
- Bake at 350°F for 25-35 minutes or until an inserted knife comes out mostly clean.
- Remove from the oven and let fully cool in the pan.
Chocolate Ganache
- Once the cake layers are fully frozen, make the ganache.
- To make the ganache, add the chopped dark chocolate to a large bowl.
- Then place the cream in a microwave safe bowl and microwave for 1-2 minutes or until hot to the touch but not boiling.
- Pour over the chopped chocolate and let sit for about two minutes. Using a spatula, gently mix until the chocolate is fully melted and the ganache is fully combined and smooth.
- Let sit for 10-15 minutes until the ganache is cool to the touch but still pourable.
Assembly
- For the ice cream layer, line a 6 inch round cake pan with plastic wrap. Add about 3 cups slightly softened vanilla ice cream to the pan and press into an even layer. Cover and let ice cream layer freeze for at least 2 hours (overnight is even better).
- After both the brownie layer and cherry compote are cool, spread the cherry filling in an even layer over top of the brownie. Then freeze for 2 hours until set.
- To assemble the cake, place the brownie and cherry layer on a serving plate, then top with a frozen ice cream layer.
- Remove the cake from the freezer and pour the cooled ganache over the top. Use on offset spatula to gently push some of the edges to create the drip effect.
- Place the cake back in the freezer for at least 30 minutes.
- Then top with fresh cherries and chocolate shavings.
Leave a Reply