
Introduction to Christmas Kitchen Sink Cookies
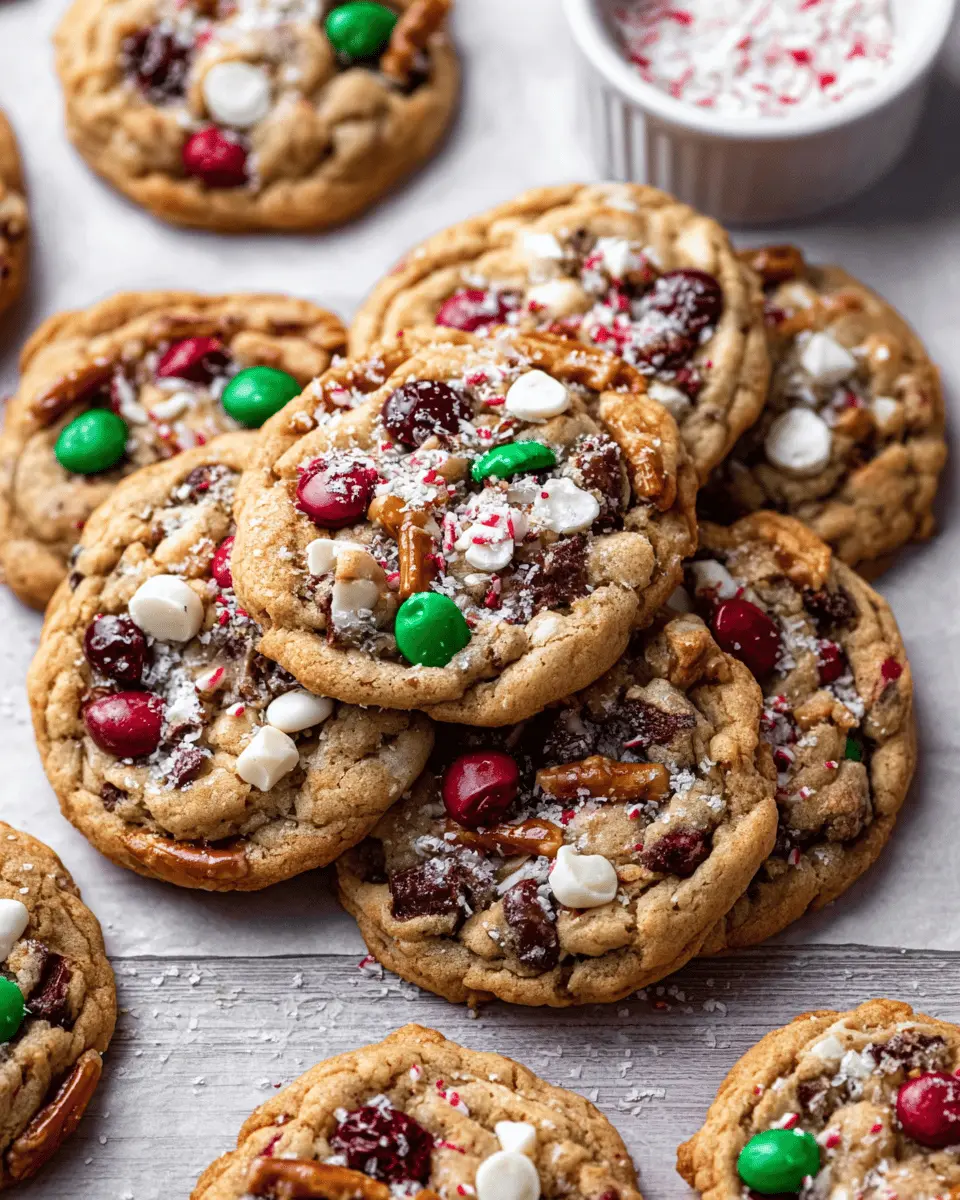
Christmas Kitchen Sink Cookies have quickly become a holiday favorite, and it’s easy to see why! These delightful treats combine a bit of everything, making them the ultimate sweet-and-salty snack. Picture this: chewy cookie dough filled with vibrant red and green M&M's, crunchy pretzel pieces, and savory potato chips. It’s a flavor explosion that perfectly captures the spirit of the season.
Why are Christmas Kitchen Sink Cookies so beloved?
One of the reasons Christmas Kitchen Sink Cookies are adored is their versatility. You can toss in your favorite mix-ins, so each batch can be a unique creation tailored to your taste. Whether you prefer an extra crunch from crushed nuts or a hint of sweetness from additional chocolate chips, the possibilities are endless!
Moreover, these cookies are perfect for holiday gatherings, making them great conversation starters. You can share the joy of baking with friends or family, crafting a new tradition that enriches your holiday experience. The combination of flavors and textures ensures that each bite is a delightful surprise, keeping everyone coming back for more.
So grab your apron and let’s start baking these crowd-pleasers! Be sure to check out more festive cookie recipes here for even more inspiration to sweeten your holiday season.

Ingredients for Christmas Kitchen Sink Cookies
Creating the perfect batch of Christmas Kitchen Sink Cookies means gathering a delightful mix of sweet and salty ingredients that come together in a uniquely delicious way. Below is a detailed list to help you assemble everything you need.
Essential Ingredients
-
¾ cup salted butter, softened
Butter adds richness and depth. Make sure it’s room temperature for smooth mixing! -
¾ cup light brown sugar, packed
The molasses in brown sugar gives a warm flavor that’s perfect for the holidays. -
¼ cup granulated white sugar
Just a touch of granulated sugar balances the richness of brown sugar. -
2 egg yolks, at room temperature
Egg yolks contribute to moisture and richness. -
2 teaspoon vanilla bean paste or extract
This enhances the cookie’s overall flavor profile, making it truly festive. -
1 ½ cups all-purpose flour, spooned and leveled
Flour is essential for structure—be sure to measure it correctly! -
½ teaspoon baking powder and ½ teaspoon baking soda
Both act as leavening agents to give your cookies a lovely rise. -
½ teaspoon salt
A pinch of salt rounds out the sweetness and enhances flavors.
Fun Add-Ins
-
½ cup red and green M&M's
These add a pop of color and a sweet crunch that kids and adults alike will adore. -
⅓ cup white chocolate chips
Creamy and decadent, these bring a delightful contrast to the other textures. -
⅓ cup pretzel pieces
Salty and crunchy, they add an unexpected twist to your cookie experience. -
⅓ cup potato chip pieces
Yes, you read that right! These bring salty goodness and a unique crunch. -
2 tablespoon red and green jimmies
These festive sprinkles are the perfect finishing touch for your holiday creations.
With these ingredients on hand, you're all set to bake up a batch of joyful Christmas Kitchen Sink Cookies. Visit this article for tips on measuring your flour to ensure the perfect cookie. Happy baking!
Preparing Christmas Kitchen Sink Cookies
Baking is one of the most delightful activities during the holiday season, and these Christmas Kitchen Sink Cookies are the perfect treat to make with friends or family. They combine sweet, salty, chewy, and crunchy elements in every bite, making them a true holiday favorite. Let’s dive into how to prepare these delicious cookies!
Gather your ingredients
Before you start, make sure you have all your ingredients ready. It makes the baking process much smoother and more enjoyable. Here's what you'll need:
- ¾ cup salted butter, softened
- ¾ cup light brown sugar, packed
- ¼ cup granulated white sugar
- 2 egg yolks, at room temperature
- 2 teaspoon vanilla bean paste or extract
- 1 ½ cups all-purpose flour
- ½ teaspoon baking powder
- ½ teaspoon baking soda
- ½ teaspoon salt
- ½ cup red and green M&M's
- ⅓ cup white chocolate chips
- ⅓ cup pretzel pieces
- ⅓ cup potato chip pieces
- 2 tablespoon red and green jimmies
Don’t forget to preheat your oven to 350°F and line those baking sheets with parchment paper!
Cream the butter and sugars
In a large mixing bowl, add your softened butter, light brown sugar, and granulated sugar. Using an electric mixer, cream them together for about two minutes. You’re looking for a fluffy, pale mixture that’s light and airy. This step is essential for creating cookies that are soft and chewy!
Mix in the eggs and vanilla
Next, add the egg yolks and vanilla bean paste (or extract) to the mixture. Continue mixing on medium speed for another two minutes. This is where the dough starts to take shape, so don't rush—let those ingredients blend until they’re well incorporated.
Combine the dry ingredients
In a separate bowl, whisk together the flour, baking powder, baking soda, and salt to ensure even distribution. Gradually add this dry mixture to your wet ingredients. Mix until just combined—overmixing can lead to tough cookies, and we definitely don’t want that!
Fold in the mix-ins
Now comes the fun part! Gently fold in the M&M's, white chocolate chips, pretzel pieces, potato chip pieces, and jimmies. Use a spatula to ensure everything is well-distributed. Each bite of your Christmas Kitchen Sink Cookies will be packed with delicious surprises, so be generous with your mix-ins!
Scoop and shape the dough
Using a cookie scoop, portion out the dough onto your prepared baking sheets, making sure to leave about two inches of space between each one. If you're feeling extra festive, add a few extra mix-ins on top of each cookie ball to make them extra appealing.
Bake and cool the cookies
Pop your baking sheets in the oven and let them bake for about 10 to 12 minutes. If you like softer cookies, aim for the shorter end of the bake time. Enjoy the wonderful aroma as they bake—nothing says holiday spirit like fresh cookies coming out of the oven! Once they're golden brown, allow them to rest on the baking sheets for 5 minutes before transferring them to a cooling rack. Let them cool further for an additional 10 minutes (if you can resist that long!).
By following these steps, you’ll have a batch of Christmas Kitchen Sink Cookies that will surely impress your friends and family. They'll be the highlight of your holiday festivities! 🎉
Variations on Christmas Kitchen Sink Cookies
Holiday-themed mix-ins
When it comes to Christmas Kitchen Sink Cookies, the mix-ins are where creativity shines! Consider swapping the traditional red and green M&M’s for festive holiday candies like peppermint bits or chocolate-covered cranberries. Dried fruits like cranberries or cherries can add a lovely chewiness, while nuts or seeds can provide a delightful crunch. Don’t hesitate to toss in some cinnamon or nutmeg for a warm, spicy twist!
Gluten-free options
Craving the joy of Christmas Kitchen Sink Cookies but need a gluten-free alternative? Simply substitute the all-purpose flour with a gluten-free blend, ensuring it contains xanthan gum for structure. You can also use almond flour for a nutty flavor or oat flour for a wholesome touch. Just remember to double-check all your mix-ins to confirm they’re gluten-free, especially the chocolates and sprinkles! Enjoy delicious cookies that everyone can savor.
Baking Tips for Christmas Kitchen Sink Cookies
Baking Christmas Kitchen Sink Cookies is a delightful way to get into the holiday spirit. Here are some tips to ensure your cookies turn out perfectly:
-
Measure Your Flour: Accurate measurements are crucial! Use the spoon-and-level method—scoop the flour into a measuring cup and level it off with a knife. This prevents overloading your dough with flour, ensuring chewy cookies.
-
Mixing Matters: Cream your butter and sugars until light and fluffy. This incorporates air, resulting in a delightful texture.
-
Customize Your Mix-Ins: Feel free to swap or add any of your favorite ingredients—like nuts or dried fruits. Just keep the ratios balanced for the best results!
-
Crispier Edges vs. Chewy Centers: If you prefer chewy cookies, bake them for 10 minutes; for a crisper texture, aim for 12 minutes. Always keep an eye on your cookies!
Looking for more tips? Head over to King Arthur Baking for expert advice! Enjoy your festive baking!

Serving Suggestions for Christmas Kitchen Sink Cookies
When it comes to serving your Christmas Kitchen Sink Cookies, the presentation can be just as delightful as the flavors. Here are a few fun ideas to elevate your cookie game this holiday season:
Pair with Festive Drinks
Consider pairing your cookies with a warm cup of hot chocolate or spiced apple cider. These beverages nicely complement the sweet and salty flavors of your cookies, making for a cozy treat.
Create a Cookie Platter
Arrange your cookies on a beautiful platter with festive garnishes like fresh mint or holly. This not only looks inviting but also encourages sharing during holiday gatherings.
Gift Wrap for Friends
These cookies make excellent gifts! Pack them in a decorated tin or cellophane bag tied with a holiday ribbon. Don’t forget to include a handwritten recipe card as a personal touch.
These serving suggestions will help you provide a memorable experience with your Christmas Kitchen Sink Cookies that everyone will enjoy!
Tips for Making Perfect Christmas Kitchen Sink Cookies
Making Christmas Kitchen Sink Cookies is a delightful experience, but a few handy tips can elevate your cookie game. Here are some helpful pointers to ensure your cookies turn out perfect every time:
-
Measure Flour Accurately: Spoon your flour into a measuring cup rather than scooping it directly. This prevents packing and excess flour, which can lead to dense cookies. For precise baking, consider weighing your flour—1 cup equals about 125 grams.
-
Don’t Overmix: Once you add the dry ingredients, mix until just combined. Overmixing can lead to tough cookies, which is the last thing we want during the holidays!
-
Experiment with Mix-ins: Feel free to personalize your Christmas Kitchen Sink Cookies by adding your favorite treats—think crushed candy canes for an extra festive flavor or substituting other chocolate varieties.
-
Shape and Decorate: For perfectly round cookies, use a large circular cookie cutter immediately after pulling them from the oven. A few extra sprinkles on top before baking can also enhance their festive appeal.
-
Cool and Store Properly: After cooling for a few minutes, let your cookies rest on a wire rack to maintain their chewy texture. Store any leftovers in an airtight container for up to three days.
Happy baking! What unique mix-ins will you try this year?
Time Details for Christmas Kitchen Sink Cookies
Preparation Time
Getting your ingredients ready for these Christmas Kitchen Sink Cookies is a breeze! You’ll need about 15 minutes to gather everything and mix up that delightful dough.
Baking Time
Once your cookie dough is prepped, it's time to bake! Each batch will take just 10-12 minutes to become golden, chewy delights—10 minutes for those soft centers or 12 if you prefer a little extra crisp.
Total Time
In total, you’re looking at about 25-30 minutes from start to finish. That’s practically no time at all for such a festive treat! Perfect for a baking session with friends or a cozy night in—why not whip up a double batch? Check out more tips on cookie baking at Baking 101.
Happy baking!
Nutritional Information for Christmas Kitchen Sink Cookies
When you indulge in these delightful Christmas Kitchen Sink Cookies, a balance of flavors and textures dances on your palate. But how do they stack up nutritionally? Here’s a quick look:
Calories
Each cookie packs approximately 150 calories, making them a sweet treat perfect for holiday celebrations without completely derailing your dietary goals.
Protein
These cookies contain about 2 grams of protein each, providing a little boost along with all that delightful sweetness.
Sodium
With around 100 mg of sodium per cookie, they're moderately salted but still tasty enough to satisfy your holiday cravings!
For more insights on nutrient values, consider exploring the USDA’s FoodData Central where you can find detailed information on ingredients you’re curious about. Remember, moderation is key, especially during festive feasts!
FAQs about Christmas Kitchen Sink Cookies
Can I use different candies for these cookies?
Absolutely! One of the best features of Christmas Kitchen Sink Cookies is their versatility. Feel free to swap out M&M's for your favorite chocolates, or even toss in some dried fruit or nuts. This is a great opportunity to use up any leftover holiday candies!
How do I store leftover cookies?
To keep your cookies fresh and delicious, store them in an airtight container at room temperature. They should last for up to three days. If you want to keep them longer, consider freezing the cookie dough before baking. Just scoop them onto a baking sheet, freeze, then transfer to a zip-top bag for easy baking later!
What if I don’t have pretzels or potato chips?
No pretzels or potato chips? No problem! You can substitute with any crunchy snack you have on hand, like corn chips or even crunched-up crackers. The idea is to maintain that delightful sweet-and-salty contrast that makes these cookies a hit.
For further tips on storing baked goods, check out this helpful resource from the Food Network on keeping cookies fresh.
Conclusion on Christmas Kitchen Sink Cookies
In conclusion, Christmas Kitchen Sink Cookies are the ultimate holiday treat that brings joy and a delightful crunch to your festive gatherings. With their sweet and salty flavor profile and colorful mix-ins, these cookies are sure to impress friends and family alike. Give them a try this holiday season!

Christmas Kitchen Sink Cookies
Equipment
- mixing bowl
- electric mixer
- baking sheet
- parchment paper
- spatula
- cookie scoop
- Cooling Rack
- cookie cutter
Ingredients
Butter and Sugars
- ¾ cup salted butter, softened
- ¾ cup light brown sugar, packed
- ¼ cup granulated white sugar
Wet Ingredients
- 2 egg yolks at room temperature
- 2 teaspoon vanilla bean paste or extract
Dry Ingredients
- 1 ½ cups all-purpose flour, spooned and leveled
- ½ teaspoon baking powder
- ½ teaspoon baking soda
- ½ teaspoon salt
Add-ins
- ½ cup red and green M&M's
- ⅓ cup white chocolate chips
- ⅓ cup pretzel pieces
- ⅓ cup potato chip pieces
- 2 tablespoon red and green jimmies
Instructions
Baking
- Preheat oven to 350 degrees. Line two baking sheets with parchment paper and set aside.
- Add softened, salted butter, light brown sugar, and granulated sugar to a large bowl. Cream the butter and sugars together with an electric mixer for two minutes, or until light and fluffy.
- Next, add in egg yolks and vanilla and mix on medium speed for two minutes, or until the mixture is pale in color and fluffy.
- Then add in flour, baking powder, baking soda and salt. Mix until combined.
- Add in the M&M's, white chocolate chips, pretzel pieces, potato chip pieces and sprinkles. Gently fold in with a spatula until everything is combined.
- Scoop the dough into 20 balls. Arrange two inches apart on the prepared baking sheets.
- *Optional* Add a few extra mix-ins on top of the scooped cookie dough balls. This will give you cookies as pictured.
- Bake for 10-12 minutes. (10 for chewier centers, 12 for crisper edges.)
- *Optional* When the cookies are straight out of the oven, use a large circular cookie cutter to give them a perfect shape.
- After baking, let the cookies cool on the baking sheets for 5 minutes. Then transfer to a cooling rack to cool for another 10 minutes.
- Store leftovers in an air tight container for up to three days.


Leave a Reply