
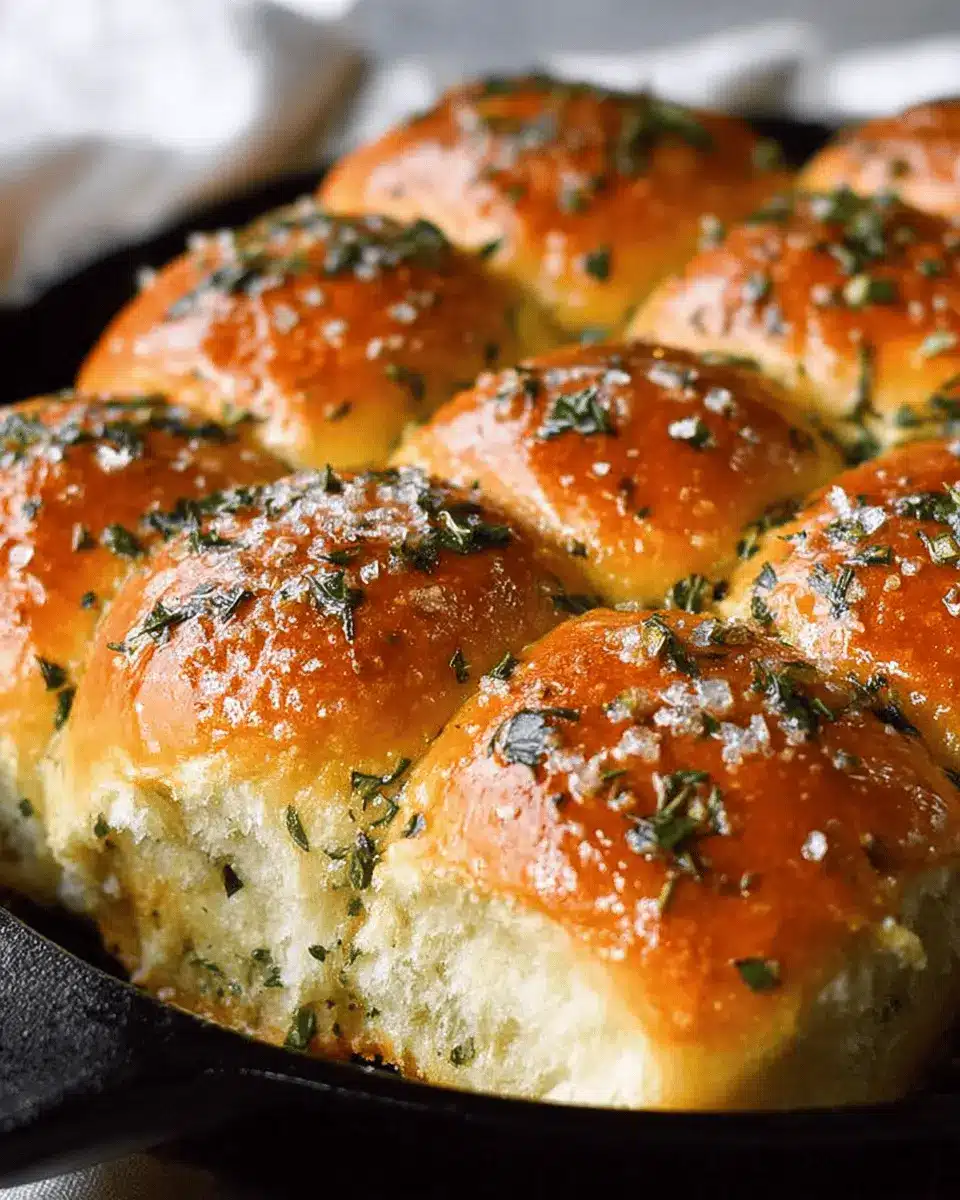
Introduction to Garlic Herb Dinner Rolls
Why Homemade Dinner Rolls Are Worth It
Have you ever wondered why homemade dinner rolls create such a stir at the dinner table? Freshly baked rolls bring a warmth and comfort that store-bought bread just can’t replicate. When you whip up these Garlic Herb Dinner Rolls, you’re giving your meal that special touch, infusing love and care into every bite. The delightful aroma that fills your kitchen as they bake? It’s a mood-lifter and guarantees to prompt a chorus of “What’s that delicious smell?” from your family or friends.
The Comfort of Fluffy Garlic Herb Rolls
Imagine sinking your teeth into a soft, fluffy roll that’s been brushed with a warm garlic and herb-infused butter right out of the oven. It’s not just food; it’s an experience. These rolls are a testament to what simple ingredients can achieve when crafted with a bit of time and passion. Plus, they’re versatile enough to accompany any meal—from cozy weeknight dinners to festive gatherings. And the best part? They’re easier to make than you’d think! So, grab your apron and let’s create something delicious that will elevate your mealtime to new heights.
Get the Recipe Garlic Herb Dinner Rolls
Prep: 15 minutes
Cook: 25 minutes
Rest Time: 2 hours
Total: 2 hours 40 minutes
Servings: 8 rolls
Ingredients
- ¼ cup warm water, heated to ~105°F
- 1 ½ tablespoons granulated sugar
- 1 tablespoon active dry yeast
- 4 tablespoons unsalted butter, divided
- ⅔ cup whole milk
- 1 egg, room temperature and lightly whisked
- 1 ¼ teaspoon fine sea salt
- 2 cups (260 grams) + 2 tablespoon all-purpose flour, additional 2 tablespoon as needed
- 1-2 garlic cloves, minced, or 1 teaspoon garlic powder
- 1 teaspoon fresh rosemary, finely chopped
- 1 teaspoon fresh thyme, finely chopped
- Sea salt flakes, to taste
Equipment
- Stand Mixer
- Kitchen Scale
- Bench Scraper
- 10-Inch Cast Iron Skillet
- Pastry Brush
Instructions
- In the bowl of a stand mixer with a bread hook, combine warmed water, sugar, and yeast. Let stand for 5-10 minutes until foamy.
- Melt 2 tablespoons of the butter and combine it with lukewarm milk (microwave it for 30-60 seconds or let sit out while prepping the yeast). Add the milk mixture to the yeast in the stand mixer, along with the lightly whisked egg, and stir to combine. Add the salt and flour, mixing on medium speed until the dough forms a ball. The dough should be slightly sticky, but if it pulls away covered in dough, add an additional 2-4 tablespoons of flour in increments until incorporated.
- Lightly grease a large bowl and transfer the dough to it. Cover the bowl with a tea towel and let the dough rise in a warm area for about 1 hour.
- Once risen, dump onto a well-floured surface and knead for 2-3 minutes, moving quickly so the dough doesn’t stick.
- Use a kitchen scale to weigh the dough, then divide weight by 8 for equal roll sizes. If you don’t have a scale, cut dough into 8 evenly sized sections.
- Create a ball for each roll and place it seam-side down on a counter or grease cast-iron skillet. Cover and let rise for another hour, until doubled in size.
- Preheat the oven to 375°F halfway through the second rise.
- Bake for 20-25 minutes until golden brown. While baking, melt the remaining butter with garlic for the topping. Once the rolls are done, brush with garlic herb butter and sprinkle with sea salt flakes.
Notes
- For faster rising, preheat the oven to 200°F, turn it off, and place the bowl inside.
- For the strongest garlic flavor, use freshly minced garlic.
- Store leftovers covered at room temperature for up to 3 days; reheat as needed.
These Garlic Herb Dinner Rolls are sure to impress your guests and elevate any meal. Happy baking!
Ingredients for Garlic Herb Dinner Rolls
Essential Ingredients
Making the perfect Garlic Herb Dinner Rolls starts with a few staple ingredients that you likely already have in your kitchen:
- ¼ cup warm water, heated to about 105°F, to help activate the yeast.
- 1 ½ tablespoons granulated sugar to nourish the yeast and add slight sweetness.
- 1 tablespoon active dry yeast for that delightful rise.
- 4 tablespoons unsalted butter, lovingly divided to ensure richness.
- ⅔ cup whole milk that’s warm enough to make the dough tender.
- 1 egg, at room temperature, gives structure and moisture.
- 1 ¼ teaspoons fine sea salt to enhance all flavors.
- 2 cups all-purpose flour (plus an extra 2 tablespoons, if needed) for a soft, fluffy texture.
- 1-2 garlic cloves, minced, or 1 teaspoon garlic powder for that irresistible garlic flavor.
- Fresh herbs, including 1 teaspoon finely chopped rosemary and 1 teaspoon finely chopped thyme for aromatic warmth.
Optional Ingredients for Extra Flavor
To elevate your Garlic Herb Dinner Rolls, you might want to consider these optional ingredients:
- Chopped parsley can add a vibrant green color and freshness.
- A pinch of black pepper for a subtle kick.
- Parmesan cheese, grated, can be included in the dough for a savory depth.
- Consider substituting some of the all-purpose flour with whole wheat flour for added nutrition and a nutty flavor.
Adding personal touches can impress your guests and make the rolls uniquely yours! If you're interested in similar recipes, check out King Arthur Baking for more bread inspirations.
Step-by-step Preparation of Garlic Herb Dinner Rolls
Making Garlic Herb Dinner Rolls is simpler than you might think—perfect for those cozy dinners or casual get-togethers. Let’s dive into the preparation with this step-by-step guide.
Activate the Yeast
To ensure your rolls turn out fluffy, it’s crucial to start with properly activated yeast. In the bowl of a stand mixer, combine ¼ cup of warm water (about 105°F), 1.5 tablespoons of sugar, and 1 tablespoon of active dry yeast. Let this mixture sit for 5-10 minutes until it becomes foamy. This indicates that the yeast is alive and raring to go!
Combine Wet Ingredients
While waiting on the yeast, you can prepare the wet ingredients. Melt 2 tablespoons of unsalted butter and mix it with ⅔ cup of whole milk until lukewarm. This will also help the yeast rise effectively. Add this milk mixture and 1 lightly whisked egg to your activated yeast and stir gently.
Mixing the Dough
Add in 1 ¼ teaspoons of fine sea salt and 2 cups + 2 tablespoons of all-purpose flour to combine all your ingredients. Mix on medium speed until the dough forms a ball. Keep in mind, it should be sticky; if it clings excessively, gradually incorporate 2-4 additional tablespoons of flour until just right.
The First Rise
Once your dough is formed, lightly grease a large bowl and transfer the dough into it. Cover it with a tea towel and let it rise in a warm area for about 1 hour. This is the magic moment where your dough will puff up beautifully!
Shaping the Rolls
After the dough has risen, place it on a floured surface and knead it for about 2-3 minutes—this helps develop its structure. Use a kitchen scale to measure equal portions (about 4 ounces each) and shape them into balls, setting them seam-side down.
The Second Rise
Arrange your shaped rolls in a greased 10-inch cast iron skillet or circular pan. Cover them again with a tea towel and let them rise for another hour. While the rolls rise, preheat your oven to 375°F.
Baking the Rolls
After your rolls have puffed up again, it’s time to bake! Place them in the preheated oven and bake for 20-25 minutes. You’ll know they’re ready when they turn golden brown and reach an internal temperature of 200-205°F.
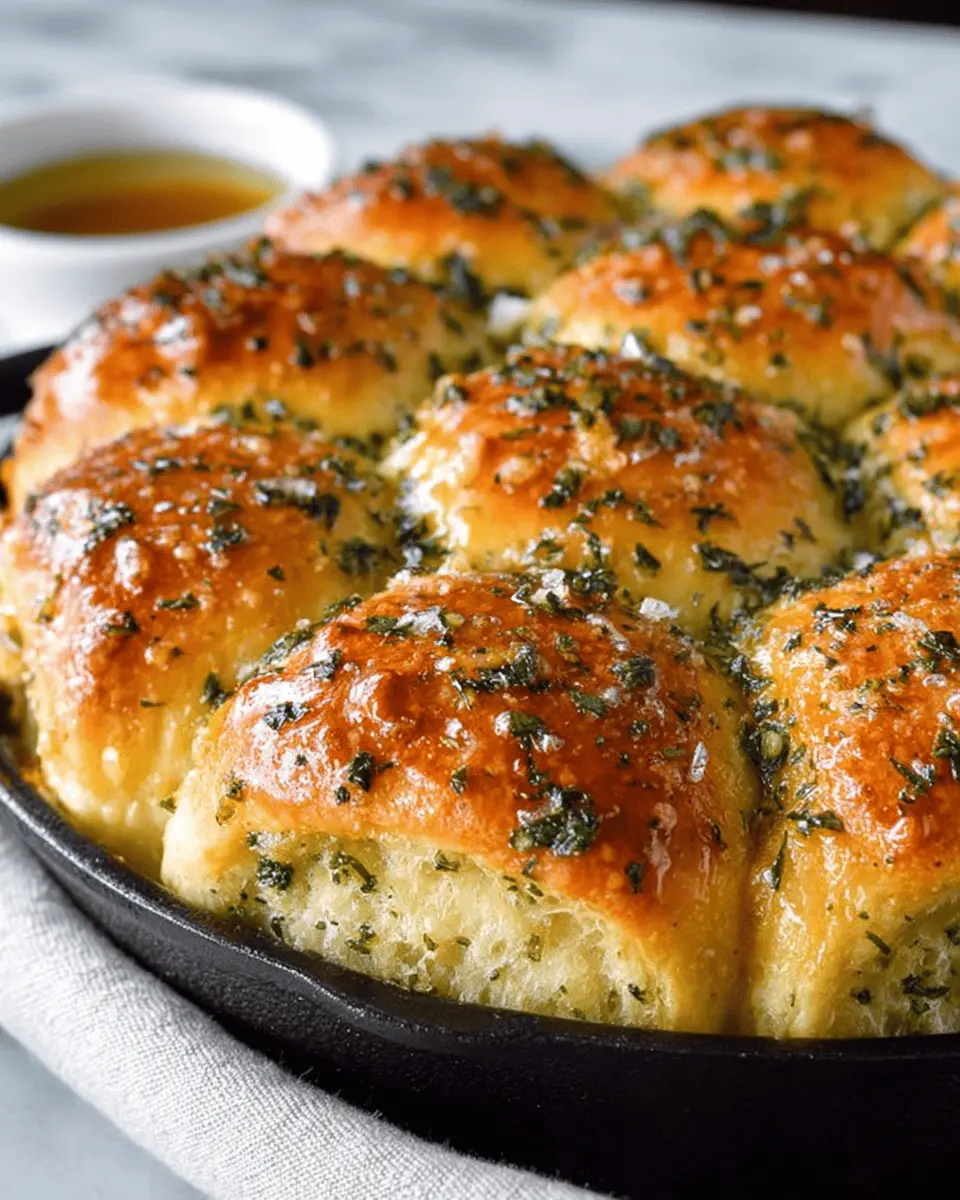
Prepare the Garlic Herb Butter
While the rolls are baking, melt the remaining 2 tablespoons of butter with 1-2 minced garlic cloves (or 1 teaspoon of garlic powder) in a small saucepan. Stir in 1 teaspoon each of chopped rosemary and thyme, infusing the flavors beautifully.
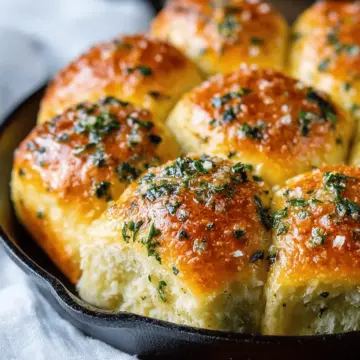
Brushing and Finishing Touches
Finally, once your Garlic Herb Dinner Rolls come out of the oven hot and fragrant, brush them generously with the garlic herb butter. A sprinkle of flaky sea salt will elevate their flavor. Let them rest for about 10 minutes before serving warm.
These rolls are not just a side; they can be the centerpiece of your meal! For tips on making them ahead or pairing them with the perfect dish, check out our resources on baking basics or herb cooking techniques. Enjoy!
Variations on Garlic Herb Dinner Rolls
Adding Cheese
For an irresistible twist, consider incorporating your favorite cheese into the Garlic Herb Dinner Rolls. Cheddar, mozzarella, or even crumbled feta can add a delightful richness. Simply fold in about 1 cup of shredded cheese into the dough before shaping the rolls. This not only enhances the flavor but also creates a gooey, cheesy center that pairs perfectly with the garlic and herbs.
Herb Alternatives
Feel free to get creative with your herb selections! While thyme and rosemary bring lovely flavors to your rolls, you could easily substitute with oregano, basil, or parsley. Mixing fresh and dried herbs can also add depth—dried herbs intensify the flavor, whereas fresh ones offer brightness. Explore what's growing in your garden or even at the grocery store for a personalized touch!
Cooking Tips and Notes for Garlic Herb Dinner Rolls
Creating the perfect Garlic Herb Dinner Rolls can be a delightful experience! Here are some helpful tips to elevate your baking game:
-
Perfect Rising: For a fast rise, preheat your oven to 200°F, turn it off, and let your dough rise inside. The gentle heat creates a warm environment, essential for fluffy rolls.
-
Fresh Garlic vs. Powder: Using fresh minced garlic gives an intense flavor. If you prefer a milder taste, try infusing the garlic in butter and removing it before serving.
-
Storage Tips: Leftover rolls can be stored at room temperature for up to three days. Reheat them briefly in the microwave or an oven for that fresh-out-of-the-oven taste.
Investing a little time in these details will make your Garlic Herb Dinner Rolls truly irresistible! For more inspiration, check out King Arthur Baking for expert baking advice.

Serving Suggestions for Garlic Herb Dinner Rolls
Ideal Dishes to Pair With
Garlic Herb Dinner Rolls are not just a side; they can elevate any meal. Pair them with:
- Soups: Delightfully complement a hearty tomato bisque or potato leek soup.
- Salads: Enjoy with a refreshing spinach salad topped with grilled chicken or turkey bacon.
- Main Courses: Perfect alongside roast chicken, beef dishes, or vegetarian casseroles for balance.
Creative Ways to Enjoy
Don't shy away from mixing things up! Try these fun ideas:
- Sliders: Slice a roll in half and fill it with your favorite deli meats like chicken ham or flavorful veggies.
- Dipping: Serve with a side of rich garlic butter or fresh marinara sauce for a more interactive experience.
- Breakfast Delight: Toast up a roll, add a smear of cream cheese, and top with smoked salmon for a delicious breakfast treat.
These suggestions will surely enhance your experience with Garlic Herb Dinner Rolls. Enjoy exploring the delicious possibilities!
Time Breakdown for Garlic Herb Dinner Rolls
Preparation Time
Getting started on your Garlic Herb Dinner Rolls is easy, with a preparation time of just 15 minutes. This includes gathering ingredients, mixing the dough, and getting everything ready for rising.
Resting Time
Patience is key! You'll need to allow the dough to rise for 2 hours in total. This step is crucial for achieving those fluffy, airy rolls you've been dreaming about.
Baking Time
The excitement builds as your rolls bake for 25 minutes at 375°F. Just enough time to fill your kitchen with that mouthwatering aroma of garlic and herbs!
Total Time
In total, you’re looking at about 2 hours and 40 minutes from start to finish. But trust me, the wait is worth every minute for those warm, savory rolls that will elevate any meal.
For tips on achieving the perfect texture, consider checking out this Baker's Handbook, where you can find a wealth of information about yeast and dough.
Nutritional Facts for Garlic Herb Dinner Rolls
Calories
Each Garlic Herb Dinner Roll contains approximately 150 calories. It's a satisfying option for a side dish without overloading your meal.
Protein
You can expect around 4 grams of protein per roll. While not a primary protein source, it contributes to your daily intake and helps keep you feeling full.
Carbohydrates
With about 26 grams of carbohydrates, these rolls provide a good energy boost, making them perfect for pairing with your favorite entrees. Enjoy each fluffy bite!
FAQs about Garlic Herb Dinner Rolls
Can I freeze these dinner rolls?
Absolutely! These Garlic Herb Dinner Rolls freeze beautifully. Once baked and cooled, simply place them in a freezer-safe bag or airtight container and pop them in the freezer. They’ll keep for up to three months. To enjoy, simply thaw at room temperature or reheat in the oven at 350°F for about 10 minutes.
What’s the best way to store leftovers?
To maintain their fluffy texture, store any leftover rolls in an airtight container at room temperature. They should remain fresh for up to three days. If needed, you can reheat them in the microwave for about 15 seconds or in a warm oven till they’re heated through, imparting that delightful warmth once again.
How can I modify the recipe for dietary restrictions?
If you have dietary restrictions, modifying these Garlic Herb Dinner Rolls is easy! Substitute all-purpose flour with a 1:1 gluten-free flour blend, and use plant-based butter and dairy alternatives to make them vegan. Always remember to enjoy experimenting in the kitchen! For more specific dietary options, check reputable sources like Healthline or Celiac Disease Foundation.
Conclusion on Garlic Herb Dinner Rolls
Making Garlic Herb Dinner Rolls is a delightful experience that results in soft, fluffy rolls perfect for any occasion. Serve them hot and brushed with herb-infused butter to elevate your meals. Trust me, they won’t last long at the dinner table! Enjoy your baking adventure!
For an in-depth guide and complete recipe, be sure to check out our full recipe here.
Garlic Herb Dinner Rolls
Equipment
- Stand Mixer
- Kitchen Scale
- Bench Scraper
- 10-Inch Cast Iron Skillet
- Pastry Brush
Ingredients
- ¼ cup warm water heated to ~105°F
- 1 ½ Tablespoons granulated sugar
- 1 Tablespoon active dry yeast
- 4 Tablespoons unsalted butter divided
- ⅔ cup whole milk
- 1 large egg room temperature and lightly whisked
- 1 ¼ teaspoon fine sea salt
- 2 cups all-purpose flour 260 grams + additional for kneading
- 1-2 cloves garlic minced or 1 teaspoon garlic powder
- 1 teaspoon fresh rosemary finely chopped
- 1 teaspoon fresh thyme finely chopped
- Sea Salt Flakes to taste
Instructions
- In the bowl of a stand mixer with a bread hook, combine warmed water, sugar, and yeast. Let stand for 5-10 minutes until foamy.
- Melt 2 tablespoons of the butter and combine it with lukewarm milk. Add the milk mixture to the yeast in the stand mixer, along with the lightly whisked egg, and stir to combine. Add the salt and flour, mixing on medium speed until the dough is formed into a ball.
- Lightly grease a large bowl and transfer the dough to it. Cover the bowl with a tea towel and let the dough rise in a warm area for 1 hour.
- Once the dough has risen, dump onto a well-floured surface and knead for 2-3 minutes.
- Weigh the dough and divide it into 8 sections. Shape each section into a ball.
- Place the balls seam side down on a cast-iron skillet or greased pan. Cover with a tea towel and let rise for another hour.
- Preheat the oven to 375°F after the rolls have risen for 30 minutes.
- Remove the tea towel and bake for 20-25 minutes until golden brown and the internal temperature reaches 200-205°F.
- Prepare the garlic herb butter by melting the remaining 2 tablespoons of butter with the garlic and herbs. Set aside.
- Brush the butter mixture on top of the hot rolls, sprinkle with flakey sea salt, let rest for about 10 minutes, and serve warm.


Leave a Reply