
Introduction to Lemon Raspberry Layer Cake
For those who crave a touch of sunshine in their dessert, lemon raspberry layer cake is the ultimate choice. Perfectly balancing zesty lemon and sweet raspberry, this cake is a vibrant treat that brings both flavor and visual delight. But why is this cake gaining popularity among young professionals?
Why lemon raspberry layer cake is a delightful choice for young professionals
In our fast-paced lives, finding time to indulge in homemade desserts can feel like a luxury. The lemon raspberry layer cake, with its simple yet stunning layers, offers a sweet escape. Made with easily sourced ingredients and straightforward steps, it transforms an ordinary weekend into something special. Plus, its bright and refreshing taste is ideal for spring and summer gatherings, whether you’re celebrating a friend's promotion or just enjoying a casual weekend brunch.
Beyond just taste, this cake can elevate your baking skills. Tackling a layer cake builds confidence in the kitchen, and it’s a fantastic way to impress at dinner parties or get-togethers. But don't worry if you're new to baking—each layer is forgiving, allowing for creativity in assembly. Ready to explore the delightful combination of lemon and raspberry? Stick around as we guide you through the steps to create your own lemon raspberry layer cake!
For more baking tips, check out resources like King Arthur Baking or BBC Good Food.
Ingredients for Lemon Raspberry Layer Cake
When it comes to baking an incredible lemon raspberry layer cake, having the right ingredients is key. Here’s a breakdown of what you’ll need for each component.
What you'll need for the cake layers
To create those deliciously fluffy cake layers, gather the following:
- 2 cups all-purpose flour
- 1 ½ teaspoon baking powder
- ½ teaspoon salt
- 1 cup granulated sugar
- 2 large eggs
- ½ cup whole milk
- ⅓ cup fresh lemon juice
- 1 tablespoon lemon zest
- ⅓ cup unsalted butter
- ⅓ cup vegetable oil
- 1 teaspoon pure vanilla extract
- 1 ¼ cups raspberries (fresh or frozen)
These ingredients combine to create a cake that’s light, citrusy, and just the right amount of sweet.
Ingredients for the raspberry filling
Next up is the raspberry filling, which adds a burst of flavor to your cake. You’ll need:
- 2 cups fresh or frozen raspberries
- ⅓ cup granulated sugar
- 1 ½ tablespoon cornstarch
- 1 ½ tablespoon water
- 1 tablespoon lemon juice
This mixture intensifies the raspberry flavor and creates that lovely tartness.
Ingredients for the lemon raspberry buttercream
Finally, let’s not forget the lemon raspberry buttercream that ties the cake together beautifully. Here’s what you need:
- 1 ½ cups unsalted butter
- 3 cups powdered sugar
- 1 tablespoon fresh lemon juice
- 1 cup freeze-dried raspberries
- 3 tablespoon whole milk
- A pinch of salt
This buttercream is sure to elevate your cake, making it both visually stunning and irresistibly delicious.
Now that you have your list ready, you're well on your way to creating a show-stopping dessert perfect for any occasion! If you’re interested in more baking tips, check out resources like King Arthur Baking for expert guidance.
Step-by-step Preparation for Lemon Raspberry Layer Cake
Preheat the oven and prepare the cake pans
Start by preheating your oven to 350ºF (177ºC). This ensures that the lemon raspberry layer cake bakes evenly! While it’s heating up, grab three 6-inch or two 8-inch cake pans. Spray the sides with cooking spray and line the bottoms with parchment paper. This little step will make it easier to remove your cake layers later—trust me!
Mix dry ingredients and combine wet ingredients
In a large mixing bowl, whisk together 2 cups of all-purpose flour, 1 ½ teaspoons of baking powder, ¼ teaspoon of baking soda, and ½ teaspoon of salt. In a separate liquid measuring cup, combine ½ cup of whole milk and ⅓ cup of freshly squeezed lemon juice. Let these sit for a moment, as the acidity of the lemon juice will slightly sour your milk—creating a delightful flavor profile.
Cream the lemon-sugar mix and add eggs
Next, in a stand mixer fitted with the paddle attachment, mix 1 ½ cups of granulated sugar with the zest of one lemon until it's aromatic. Add in ⅓ cup of unsalted butter and cream it together until light and fluffy, about 2 minutes. Then, mix in ¼ cup of vegetable oil, followed by 3 large eggs one at a time. Don't forget to add 2 teaspoons of pure vanilla extract—this is where the magic really starts!
Incorporate the flour and raspberry filling into the batter
Once everything is nice and creamy, turn the mixer down and add your dry ingredients all at once. Slowly stream in the lemon milk mixture and mix until just combined—take care not to over-mix! Take 1 ¼ cups of raspberries (frozen or fresh) and coat them in 1 teaspoon of flour, then gently fold them into your batter. This will prevent them from sinking to the bottom while baking.
Bake the layers and let them cool
Spoon the batter into your prepared cake pans, dividing it evenly. Bake in your preheated oven for about 30-35 minutes or until a toothpick comes out clean. Once baked, let the cakes cool for about 5 minutes in the pans before transferring them onto a wire rack to cool completely.
Prepare the raspberry filling
While your cake layers are cooling, let’s whip up that delicious raspberry filling. In a saucepan, combine 1 ½ tablespoons of cornstarch with 1 ½ tablespoons of water. Stir in 2 cups of raspberries, ⅓ cup of granulated sugar, and 1 tablespoon of lemon juice. Cook over medium heat until it thickens, which takes about 5 minutes of stirring.
Make the lemon raspberry buttercream
For the crowning glory of your lemon raspberry layer cake, prepare the buttercream. Grind 1 cup of freeze-dried raspberries into powder in a food processor and sift out the seeds. Mix 1 ½ cups of unsalted butter until creamy, add your raspberry powder, lemon juice, and milk. Finally, incorporate 5 cups of powdered sugar until smooth.
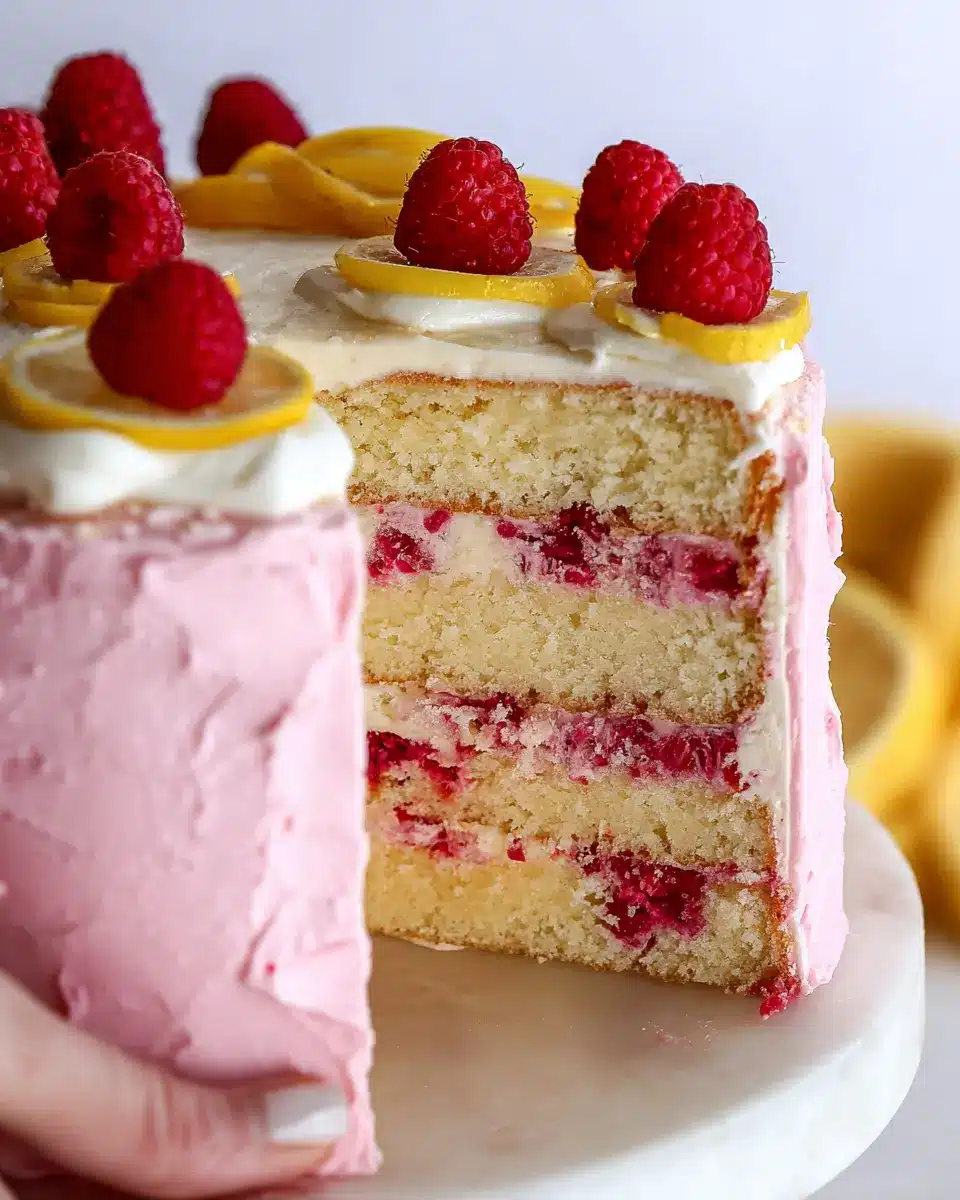
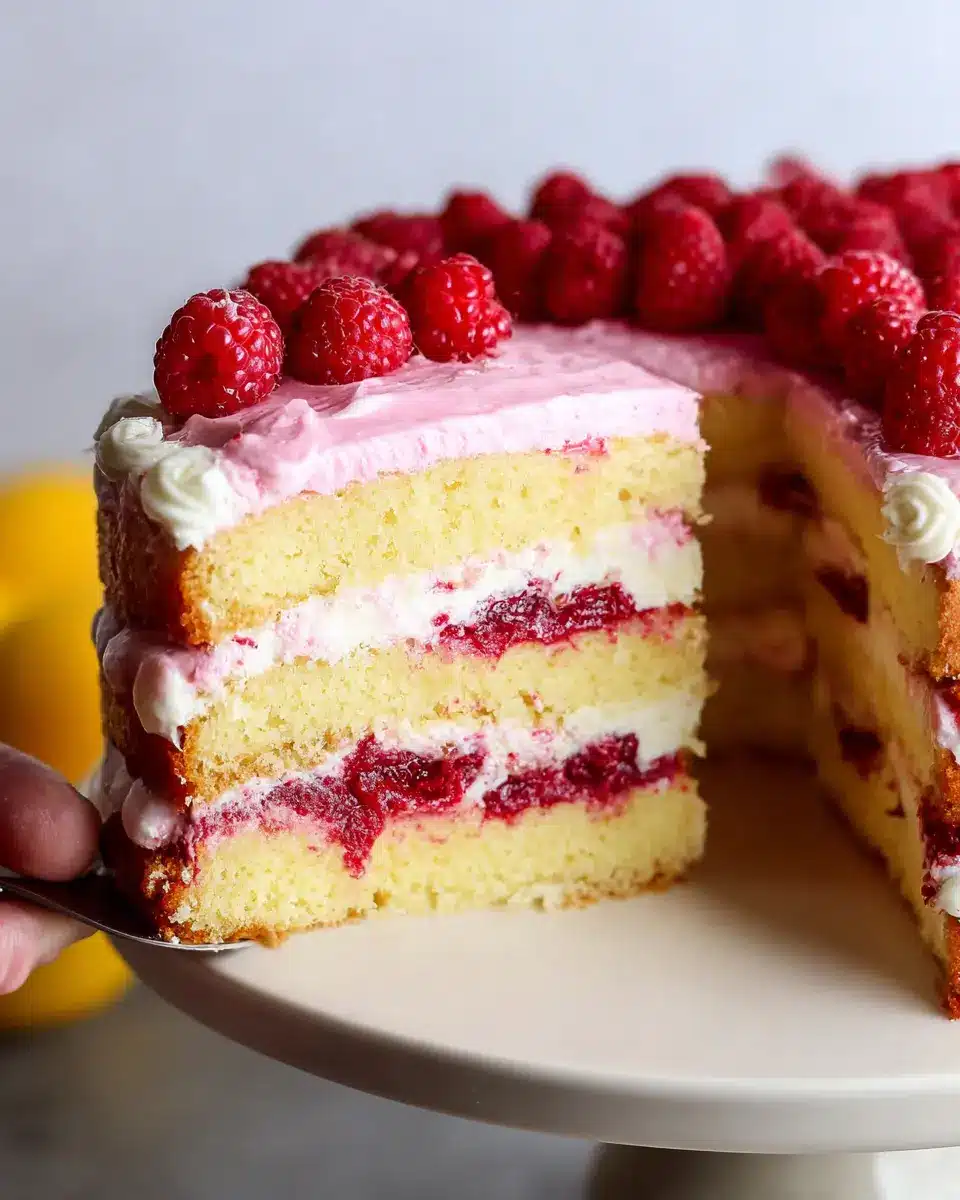
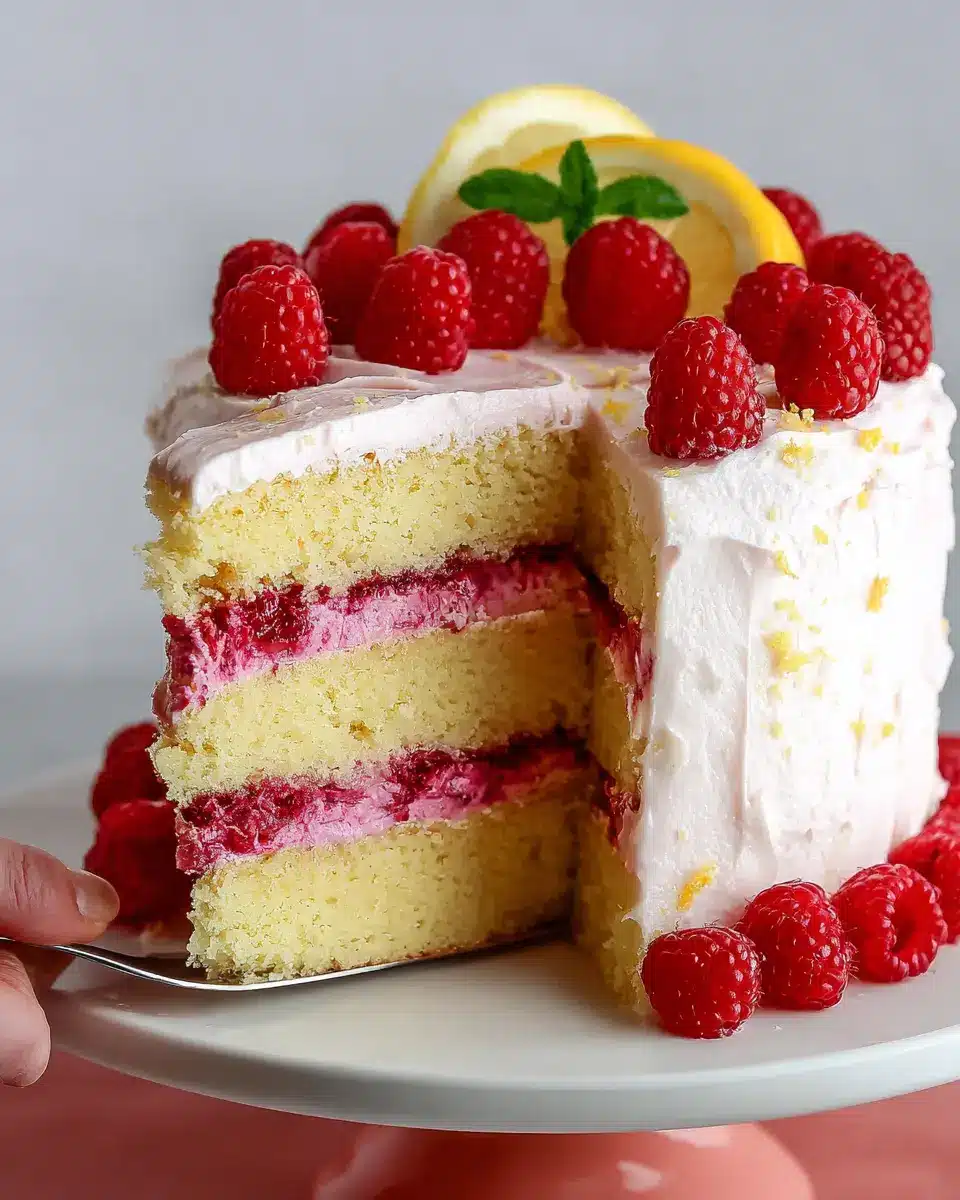
Assemble the cake with layers and frosting
Now for the fun part—assembly! Level your cooled cakes, then place the first layer on a cake board. Spread a layer of buttercream around the edge, fill it with raspberry filling, and top with more buttercream. Repeat for each layer, finishing with the final layer upside down. Crumb coat the cake with more buttercream and refrigerate for at least 30 minutes to set the frosting, making for easier decorating.
Now you’re ready to serve a stunning lemon raspberry layer cake that will wow your friends and family! Enjoy, and don’t forget to share your creations on social media — we love to see them!
Variations on Lemon Raspberry Layer Cake
Lemon Blueberry Layer Cake
For a delightful twist on the classic lemon raspberry layer cake, consider crafting a lemon blueberry layer cake! Simply replace the raspberries with fresh or frozen blueberries, and follow the same steps for baking and frosting. The sweet-tart blueberries create a wonderful contrast with zesty lemon, making it a great choice for summer gatherings. Plus, you can achieve a gorgeous blue hue in the frosting by swapping in blueberry purée—your guests will be wowed!
Lemon Raspberry Gluten-Free Option
If you’re looking for a gluten-free variation of the lemon raspberry layer cake, it’s easier than you think! Substitute the all-purpose flour with a high-quality gluten-free flour blend. Ensure it contains xanthan gum for proper texture. The rest of the ingredients remain the same, allowing you to enjoy the delightful blend of lemon and raspberry without compromising on taste. Be sure to check out thriving gluten-free communities for tips on alternative baking methods!
Cooking Tips and Notes for Lemon Raspberry Layer Cake
Helpful Hints for Achieving the Best Texture
To ensure your lemon raspberry layer cake is as tender and moist as possible, be mindful of incorporating your ingredients properly. Cream the butter and sugar until light and fluffy, which incorporates air and contributes to a light texture. Avoid over-mixing once you add the flour; mix just until combined to maintain that lovely fluffy crumb.
Advice for Substituting Ingredients
If you’re looking to make swaps, you can replace all-purpose flour with a gluten-free blend for a gluten-free version. For a healthier twist, consider using Greek yogurt in place of some of the butter or oil to reduce fat without sacrificing moisture. If you can’t find freeze-dried raspberries, fresh or frozen will work—just adjust the quantity for sweetness and moisture! For more tips, check out King Arthur Baking's ingredient substitution guide.
Serving Suggestions for Lemon Raspberry Layer Cake
Best Accompaniments for a Refreshing Dessert
Elevate your lemon raspberry layer cake experience with delightful accompaniments. Consider serving it alongside:
- Fresh Berries: A mix of strawberries, blueberries, or blackberries enhances the fruity profile.
- Whipped Cream: Lightly sweetened whipped cream adds creaminess without overpowering the lemony zest.
- Herbal Tea: A warming chamomile or refreshing mint tea creates a perfect balance with the cake's tartness.
Presentation Tips for Serving at a Gathering
When you're ready to impress, think about how you display your lemon raspberry layer cake. Here are a few tips:
- Layered Display: Use a cake stand for height and elegance. A simple footed glass stand elevates your cake visually.
- Fresh Garnish: Top with additional raspberries and a dusting of powdered sugar for a charming finish.
- Slice Style: For a professional touch, serve wedges on small, colorful plates, accompanied by a dollop of whipped cream or a scoop of sorbet.
These small details can make a big impact at your next gathering! For more tips on serving desserts, check out The Cake Blog.
Time Breakdown for Lemon Raspberry Layer Cake
When it comes to baking a delightful lemon raspberry layer cake, knowing your time commitment is essential. Here’s a handy breakdown to help you plan your baking adventure!
Preparation Time
Set aside about 30 minutes to gather your ingredients, measure them out, and mix the cake batter. This time allows for a fun and unhurried start to your baking experience!
Baking Time
The actual baking will take approximately 30-35 minutes. Keep an eye on your cake during the last few minutes to ensure a perfectly moist texture.
Total Time
In total, you’re looking at around 1 hour and 5 minutes from start to fresh-baked goodness, not including cooling time or chilling the raspberry filling. It’s all worth the wait when that luscious lemon raspberry layer cake is finally ready to impress your friends and family!
For tips on how to maximize your baking efficiency, check out this helpful article from King Arthur Baking!
With this time breakdown in mind, you can enjoy a delightful baking journey and have the perfect dessert ready for any occasion.
Nutritional Facts for Lemon Raspberry Layer Cake
Estimated calories per slice
Each slice of this delightful lemon raspberry layer cake comes in at approximately 350 calories. This makes it a perfect indulgence for dessert lovers while still fitting into a balanced diet.
Nutritional highlights
This cake isn't just delicious; it also packs some nutritional benefits. The lemons provide vitamin C, which is essential for a healthy immune system, while raspberries are rich in fiber and antioxidants. Additionally, this recipe uses whole milk and unsalted butter, ensuring a creamy texture and wholesome flavor. Enjoy in moderation to savor every layer of this delightful treat!
For a deeper dive into the health benefits of raspberries and vitamin C, check out Healthline for more insights.
FAQs about Lemon Raspberry Layer Cake
Can I use fresh raspberries instead of frozen?
Absolutely! While frozen raspberries are recommended to prevent excess juice leaking into the batter, you can use fresh raspberries for a vibrant flavor. Just remember to tear them apart with your hands instead of chopping to keep their integrity intact.
How long can I store leftover lemon raspberry cake?
You can store your lemon raspberry layer cake in the refrigerator for up to five days. Make sure to cover it well to maintain its moisture. For the best taste, let it sit at room temperature for an hour or so before serving.
What if I don't have a stand mixer for the buttercream?
No problem at all! You can use a handheld mixer or even whisk by hand if you're feeling strong. Just be prepared to put in a little extra elbow grease to achieve that light and fluffy texture for your buttercream. If you're looking for detailed tips, check out this guide on making buttercream without a stand mixer.
Conclusion on Lemon Raspberry Layer Cake
Homemade treats don't get better than this lemon raspberry layer cake! Perfect for busy professionals, it combines vibrant flavors with straightforward prep and storage options, allowing for a delightful dessert without the fuss. Treat yourself to this fresh, delicious cake that brings a taste of spring to any gathering!
Recap of Why This Cake is a Perfect Homemade Treat for Busy Professionals
With its zesty lemon notes complemented by sweet raspberries, this cake checks all the boxes for a show-stopping dessert that's surprisingly easy to make. Plus, its make-ahead capabilities mean you can enjoy a slice without sacrificing your precious time. Just prepare the components in advance and assemble whenever you’re ready.
If you’re looking for more inspiration, check out these baking tips that can further simplify your kitchen adventures. Whether it’s for a celebration or a simple indulgence, this lemon raspberry layer cake will surely brighten your day.

Lemon Raspberry Layer Cake
Equipment
- Stand Mixer
- baking pans
- mixing bowls
- rubber spatula
- food processor
- measuring cups
- measuring spoons
Ingredients
Lemon Raspberry Cake
- 2 cups all-purpose flour
- 1.5 teaspoon baking powder
- 0.25 teaspoon baking soda
- 0.5 teaspoon salt
- 0.5 Cup whole milk room temperature
- 0.33 Cup lemon juice from 3-4 medium lemons
- 1 tablespoon lemon zest from 1 medium lemon
- 1.5 cups granulated sugar
- 0.33 Cup unsalted butter room temperature
- 0.25 Cup vegetable oil
- 3 large eggs room temperature
- 2 teaspoon pure vanilla extract
- 1.25 Cups frozen or fresh raspberries *
- 1 teaspoon all-purpose flour for coating the raspberries
Raspberry Filling
- 1.5 tablespoon cornstarch
- 1.5 tablespoon water
- 2 Cups fresh or frozen raspberries
- 0.33 Cup granulated sugar
- 1 tablespoon lemon juice
Lemon Raspberry Buttercream
- 1 Cup freeze-dried raspberries **
- 1.5 Cups unsalted butter room temperature
- 1.5 tablespoon fresh squeezed lemon juice
- 3 tablespoon whole milk room temperature
- 5 cups powdered sugar
- 1 pinch salt or to taste
Garnish
- 1 twisted lemon slice
- 0.25 Cup fresh raspberries
Instructions
Make the Lemon Raspberry Cake
- Preheat the oven to 350ºF/177ºF and prepare three 6-inch or two 8-inch cake pans by spraying the sides with cooking spray and fitting a parchment paper circle to the bottoms.
- In a large bowl, whisk together the flour, baking powder, baking soda, and salt. Set aside. In a liquid measuring cup, whisk together the milk and lemon juice and set aside.
- Using a stand mixer fitted with the paddle attachment, mix together the sugar and lemon zest until fragrant and well combined, about 1 minute. Add the butter and cream it together with the lemon-sugar mixture on medium speed until light and fluffy, about 2 minutes. Add the vegetable oil and beat until combined, light and creamy, about 3 minutes. Scrape down the bowl and paddle as needed.
- With the mixer on low speed, add the eggs one at a time and mix until combined. Add the vanilla, then turn the mixer to medium speed and beat for one minute.
- Turn the mixer off and add the flour mixture all at once. Mix on low speed until just combined, then slowly pour in the lemon milk mixture. Mix until just combined, about 30 seconds.
- In a small bowl, break up the frozen raspberries into smaller pieces and coat them in 1 teaspoon of flour. Then, fold them into the cake batter with a rubber spatula.
- Divide the cake batter evenly between the prepared cake pans and bake for 30-35 minutes, until a toothpick inserted into the centers comes out clean or with a few moist crumbs. Cool for 5 minutes before removing the cakes from the pans. Transfer the cake layers to a wire rack to cool completely to room temperature.
Make the Raspberry Filling
- In a small bowl, whisk together the cornstarch and water until combined. Add it into a medium saucepan along with the raspberries, granulated sugar, and lemon juice. Set the saucepan over medium heat and stir with a rubber spatula to combine. Cook until the mixture begins to boil, mashing down the raspberries as they soften.
- Once the mixture starts to boil, set the timer for 5 minutes while you continue stirring occasionally. Then, remove from heat and transfer to a heat proof container. It won’t seem super thick at this point, but don’t worry – it will thicken significantly as it cools. Let the raspberry filling sit at room temperature for about 20 minutes, then cover and refrigerate for at least 4 hours and up to 1 week.
Make the Lemon Raspberry Buttercream
- With a food processor, grind the raspberries into a fine powder. Sift out the seeds (if a few seeds end up in the powder that is totally ok) and set the powder aside.
- Whip the butter using a stand mixer with a paddle attachment on medium-high speed until it’s creamy and light in color (5 minutes). Add the lemon juice, milk, and raspberry powder and continue to mix on medium until fully combined.
- Turn the mixer to low speed and add the powdered sugar a few cups at a time, scraping down the bowl and paddle after each addition. Add a pinch of salt and continue mixing on low speed until fully combined and smooth, 1-2 minutes.
Assembly
- Once the cake layers have cooled completely, level them to your desired height. Add a swipe of buttercream onto a cardboard cake circle and place the first cake layer on top. Pipe a circle of lemon raspberry buttercream around the edge of the layer, then fill in the center with the cooled raspberry filling until it reaches almost to the top of the dam, then cover the top with more of the lemon raspberry buttercream.
- Add the next cake layer on top and continue filling and stacking the cake layers with the raspberry filling and lemon raspberry frosting, placing the final cake layer upside down on top. Crumb coat the cake with more lemon raspberry buttercream, then refrigerate the crumb coated cake for at least 30 minutes to let everything firm up.
- To create the design pictured, frost a smooth buttercream finish with the lemon raspberry buttercream and keep the top edge raw. Garnish with a twisted lemon slice and fresh raspberries.

Leave a Reply