
Introduction to Mini Cheesecakes
Have you ever found yourself at a gathering, scanning the dessert table for something sweet yet manageable? Enter mini cheesecakes: the perfect bite-sized indulgence that combines creamy cheesecake richness with the convenience of finger food. By opting for mini cheesecakes, you can provide your guests with a delightful treat that satisfies their sweet cravings without the guilt of overindulging in a full-sized slice.
Why choose mini cheesecakes for your next gathering? First, they’re incredibly versatile. You can customize them with various flavors and toppings, from classic vanilla and fruity options to rich chocolate or caramel. Additionally, their petite size makes them ideal for parties, weddings, or casual get-togethers, allowing guests to sample multiple flavors without committing to a single dessert.
These mini delights also lend themselves beautifully to presentation, whether you’re using elegant cupcake liners or creative toppings. For additional inspiration, check out renowned baking sites like Sally's Baking Addiction for expert techniques on making your mini cheesecakes shine. With their crowd-pleasing appeal and endless customization options, mini cheesecakes can turn any gathering into a sweetly memorable event.
Ingredients for Mini Cheesecakes
Creating mini cheesecakes at home is super rewarding, and having the right ingredients makes all the difference. Let’s break down what you need for the perfect crust and filling.
Essential ingredients for the crust
For the crust, you’ll want:
- Graham cracker crumbs: 1 cup (about 8 full sheets) creates a delicious base with a delightful crunch.
- Granulated sugar: 2 tablespoons add just the right touch of sweetness.
- Unsalted butter: 3 tablespoons, melted, helps bind everything together while adding richness.
These ingredients are easy to find and really do set the stage for what’s to come!
Key components for the filling
Now, onto the filling, where you’ll transform simple ingredients into a creamy dream! Here’s what you’ll need:
- Cream cheese: 16 ounces (ideally full-fat) creates that classic cheesecake flavor.
- Granulated sugar: ½ cup enhances sweetness and balances tanginess.
- Sour cream: ¼ cup adds a smooth texture and rich flavor.
- Vanilla extract: 1 teaspoon for that comforting aroma and taste.
- Lemon juice: 1 teaspoon brightens up the flavors beautifully.
- Eggs: 2 large, bringing everything together for that perfect creaminess.
These elements work harmoniously to create the ultimate bite-sized indulgence. Are you ready to mix and indulge? For a detailed guide, be sure to check out more tips on perfecting your mini cheesecakes!
Preparing Mini Cheesecakes
Crafting delightful mini cheesecakes is a fantastic way to impress guests or treat yourself! Follow these simple steps to create creamy, irresistible bites that everyone will love.
Preheat and Line the Muffin Pan
Start by preheating your oven to 350°F (177°C). This ensures your mini cheesecakes will bake evenly. While that’s heating up, grab a standard 12-count muffin pan and line it with cupcake liners. Lining the pan not only helps with easy removal but also keeps the cheesecakes looking tidy.
Make the Graham Cracker Crust
Now, let’s whip up the graham cracker crust. In a medium bowl, combine 1 cup of graham cracker crumbs, 2 tablespoons of granulated sugar, and 3 tablespoons of melted unsalted butter. Mix until the texture resembles wet sand. Firmly press a heaping tablespoon of this crust mixture into each muffin liner. Pop them into the oven for about 6 minutes, allowing those delicious flavors to meld and set the foundation for your mini cheesecakes.
Prepare the Creamy Filling
Next comes the star of the show—the cheesecake filling! Using either a stand or handheld mixer, beat together 16 ounces of softened cream cheese and ½ cup of granulated sugar on medium-high speed for about 2 minutes, or until smooth and creamy. Add in ¼ cup of sour cream, a teaspoon of vanilla extract, and a teaspoon of freshly squeezed lemon juice, mixing until well combined. Finally, incorporate 2 large eggs one at a time—just mix until each is blended in; you don't want to overdo it. Divide this creamy goodness evenly among the muffin liners, filling them to the top.
Optional Water Bath Technique
For a silky, smooth texture, consider using a water bath. It’s optional, but it truly elevates the cheesecakes. Boil a pot of water and have a large metal roasting pan ready. Pour about an inch of boiling water into the roasting pan and place it on the bottom oven rack. This helps create steam, gently cooking the mini cheesecakes and minimizing cracking. Place your muffin pan on the center rack and close the oven door quickly to trap that steam!
Bake and Cool the Cheesecakes
Bake for approximately 20 minutes until the edges are set and the centers jiggle slightly when you tap the pan. Once they’re out of the oven, let them cool on a rack for about 45 minutes at room temperature. Then transfer the mini cheesecakes to the refrigerator for at least 2 hours (or up to 24 hours) to chill and set perfectly. If you're in a hurry, the freezer works in about an hour. Make sure to loosely cover if chilling for longer!
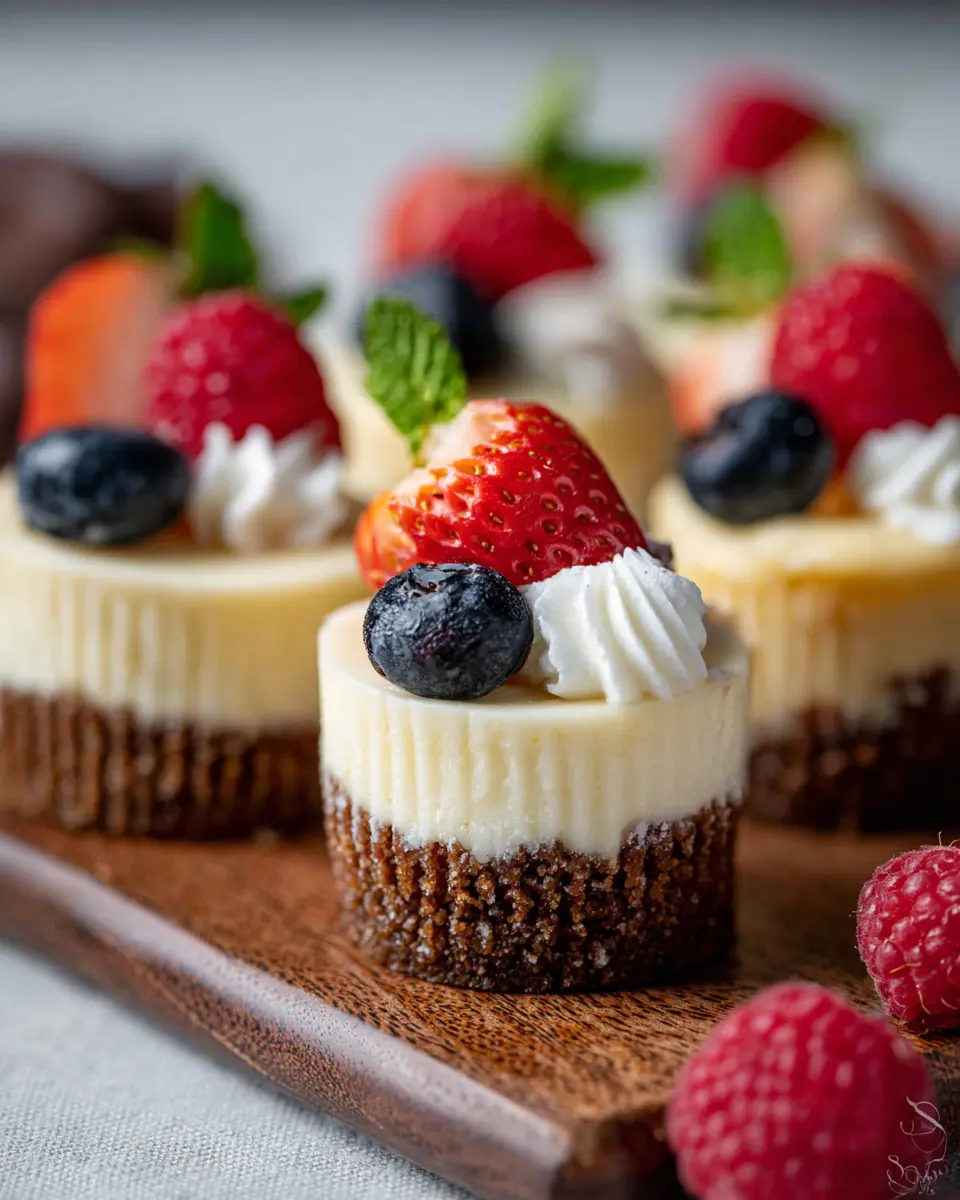
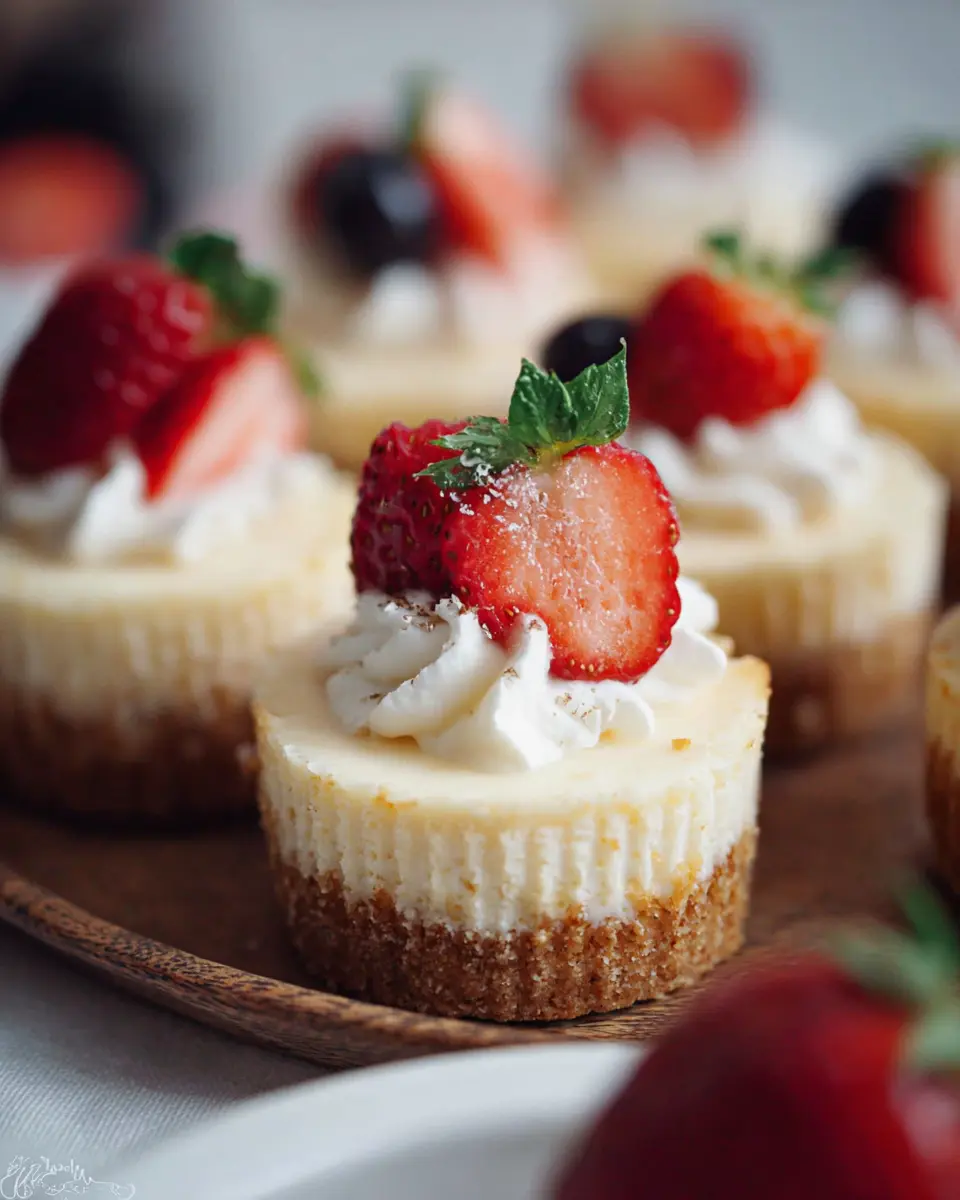
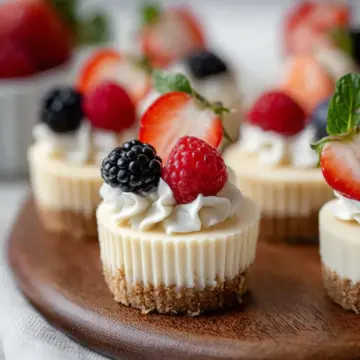
Now you’re ready to enjoy these delightful mini cheesecakes! Feel free to top them with whipped cream, berries, or anything your heart desires. The options are endless!
For more cheesecake inspiration, check out Sally's Baking Addiction for tips and creative variations!
Variations on Mini Cheesecakes
Fruit-topped Mini Cheesecakes
One of the simplest ways to elevate your mini cheesecakes is by adding fresh fruit toppings. Consider vibrant strawberries, blueberries, or a zesty mango puree for a refreshing twist. Not only do these fruits add color, but they also provide a delightful contrast to the rich cheesecake filling. For an added touch, a drizzle of homemade fruit syrup can take your mini cheesecakes to another level of deliciousness. Remember, the sweeter the fruit, the less sugar you might want to add to your filling.
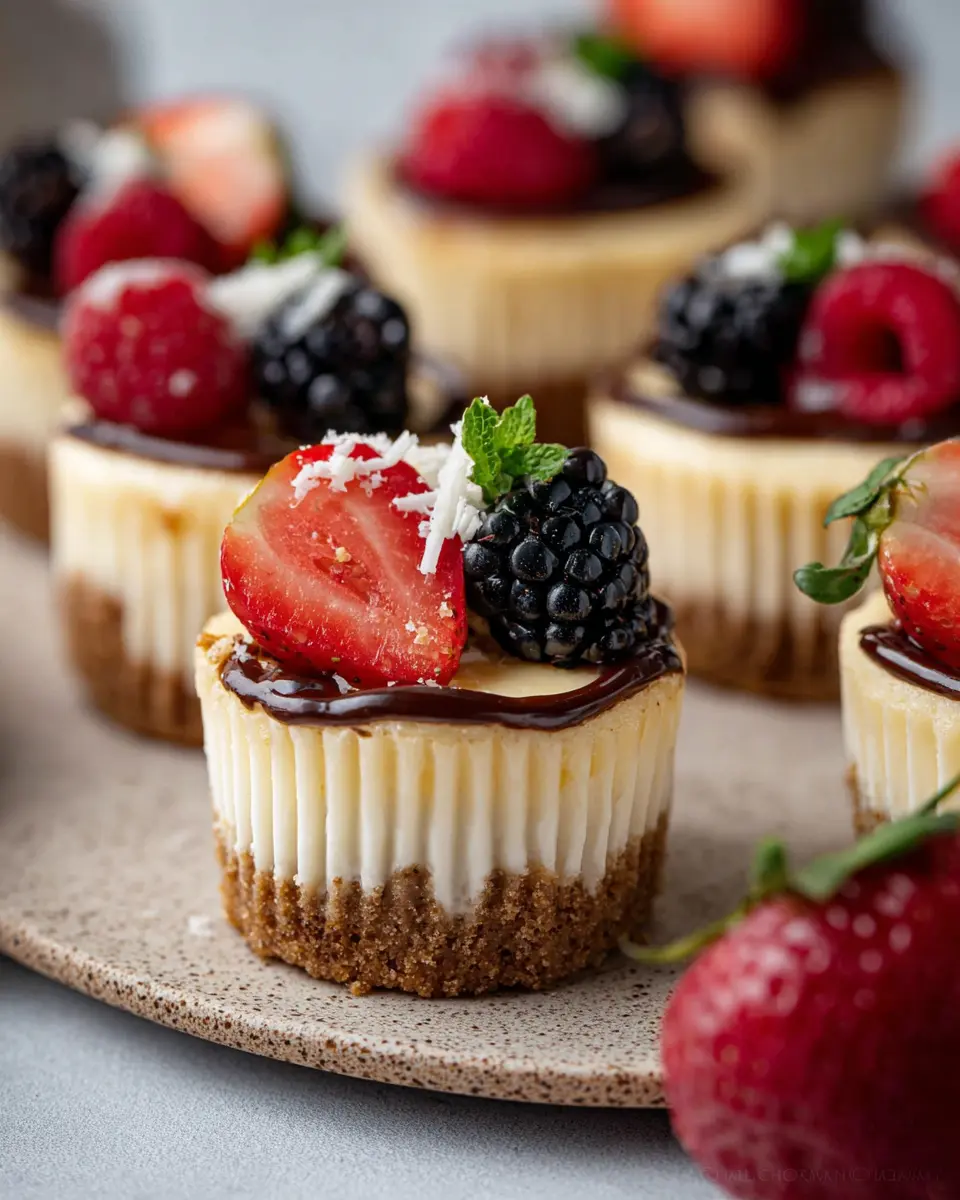
Chocolate Mini Cheesecakes
For the chocolate lovers, creating chocolate mini cheesecakes is a dream come true! Simply melt some semi-sweet chocolate and incorporate it into your cream cheese filling for a rich, gooey result. You can also layer chocolate ganache on top or mix in chocolate chips for some added crunch. This variation pairs beautifully with a sprinkle of sea salt or crushed nuts on top, balancing the sweetness with a savory kick. Trust me, this is a treat that you won’t want to miss!
Baking notes for Mini Cheesecakes
Common baking mishaps to avoid
Baking mini cheesecakes can be a delightful experience, but a few common mishaps can turn sweet success into a cringe-worthy disaster. Here’s what to watch out for:
- Over-mixing the batter: When incorporating the eggs, mix just until combined. Over-mixing can introduce too much air, leading to cracks as your cheesecakes cool.
- Ignoring ingredient temperature: Ensure cream cheese and eggs are at room temperature. This helps create a smoother filling that bakes evenly.
- Fluctuating oven temperatures: Keep an eye on your oven; using an oven thermometer can ensure precision. A steady temperature promotes an even bake.
By avoiding these pitfalls, you’ll be well on your way to enjoying perfectly decadent mini cheesecakes!
Serving Suggestions for Mini Cheesecakes
Creative Ways to Present Your Mini Cheesecakes
When it comes to serving mini cheesecakes, presentation can elevate them from delicious treats to show-stopping desserts. Here are some creative ideas to inspire you:
- Individual Servings: Serve each mini cheesecake in a decorative glass or jar topped with fresh berries and a sprig of mint for an elegant touch.
- Gourmet Toppers: Elevate the flavor by topping them with unique items like caramel sauce, chocolate ganache, or even crushed cookies for a delightful crunch.
- Themed Displays: Arrange your cheesecakes on a tiered cake stand for a beautiful display, perfect for events or gatherings.
- Flavor Variations: Experiment with flavors by mixing in fruit purees or adding different extracts to the batter—don’t shy away from creativity!
These easy presentation ideas will make your mini cheesecakes a memorable and irresistible dessert at your next gathering!
Ingredient Tips for Texture and Flavor
To create the perfect mini cheesecakes, the quality of your ingredients is paramount.
- Cream Cheese: Use full-fat, brick-style cream cheese. It makes the filling rich and creamy, ensuring a dreamy texture. Avoid whipped or spreadable versions as they can make the filling too airy.
- Room Temperature: Ensure your cream cheese, sour cream, and eggs are at room temperature. This step helps achieve a smooth batter without lumps.
- Flavor Boosters: Don’t skip the vanilla extract and lemon juice! They add depth and brightness, balancing the cheesecake's richness.
For more tips, check out this helpful article on cheesecake tips. Happy baking!
Time Details for Mini Cheesecakes
Preparation Time
Getting your ingredients together and prepping for these delightful mini cheesecakes will take about 15 minutes. It’s a quick process that involves mixing the crust and filling, so you can focus on the fun part—baking!
Baking Time
Once your mini cheesecakes are prepped, they’ll bake in the oven for approximately 20 minutes. Keep an eye on them as they bake; the edges should look set while the centers retain a slight jiggle.
Total Time
From start to finish, including cooling and chilling, plan for about 3 hours and 15 minutes. Don't rush the chilling step, as it’s crucial for achieving that perfectly creamy texture. Trust us, it's worth the wait!
For more tips on achieving the best results, check out Sally’s Baking Addiction for expert insights. Happy baking!
Nutritional Information for Mini Cheesecakes
When you're enjoying mini cheesecakes, it’s great to know what you’re indulging in. Here’s a quick breakdown of their nutritional profile:
Calories
Each mini cheesecake typically contains about 180 calories. This makes them a delightful treat that can fit into a balanced diet.
Protein
These little dessert wonders pack in around 3 grams of protein. While not a primary protein source, every bit counts toward your daily intake.
Sodium
With about 150 mg of sodium per cheesecake, they are fairly low in salt, making them suitable for most diet plans. For more detailed nutrition guidelines, check out the USDA's food database for additional insights.
Enjoy your mini cheesecakes, and remember — it's all about balance!
FAQs about Mini Cheesecakes
How can I prevent the mini cheesecakes from cracking?
To keep your mini cheesecakes looking perfect, avoid overmixing the batter and ensure your ingredients are at room temperature. If you're feeling adventurous, try using a water bath while baking to introduce humidity, which can significantly reduce the chances of cracks. Just remember, a gentle bake is key!
What's the best way to store leftover mini cheesecakes?
Storing leftover mini cheesecakes is super simple. Just cover them with plastic wrap or foil, and keep them in the refrigerator for up to five days. If you’d prefer to keep them longer, you can freeze them in an airtight container. Just thaw in the fridge before serving for the best texture.
Can I make mini cheesecakes in advance?
Absolutely! Mini cheesecakes are perfect for prep ahead of time. You can make them up to 24 hours in advance and they’ll stay delicious in the fridge. Just wait to add any toppings until you’re ready to serve. This way, they maintain their fresh taste and perfect appearance!
Conclusion on Mini Cheesecakes
In summary, these delightful mini cheesecakes are perfect for any gathering or simple indulgence at home. They’re easy to make, customizable, and oh-so-tasty! With a smooth filling and buttery crust, they’ll satisfy your sweet tooth. Embrace your baking journey and let these treats shine! Explore more dessert recipes here.
Mini Cheesecakes
Equipment
- Muffin Pan
- mixing bowl
- handheld mixer
- roasting pan
Ingredients
Crust
- 1 cup graham cracker crumbs (about 8 full sheet graham crackers)
- 2 Tablespoons granulated sugar
- 3 Tablespoons unsalted butter melted
Filling
- 16 ounces full-fat cream cheese softened to room temperature
- ½ cup granulated sugar
- ¼ cup full-fat sour cream at room temperature
- 1 teaspoon pure vanilla extract
- 1 teaspoon freshly squeezed lemon juice
- 2 large eggs at room temperature
Instructions
Preparation
- Preheat oven to 350°F (177°C). Line a standard muffin pan with cupcake liners.
- Make the crust: Combine all of the crust ingredients in a medium bowl. Mixture will be sandy. Firmly press a heaping Tablespoon of crust mixture into each liner. Bake the crusts for 6 minutes.
- Make the filling: Using a handheld or stand mixer fitted with a paddle or whisk attachment, beat the cream cheese and granulated sugar together on medium-high speed in a large bowl until the mixture is completely smooth and creamy, about 2 minutes. Add the sour cream, lemon juice, and vanilla extract, and beat until fully combined. With the mixer running on medium speed, add the eggs 1 at a time, beating just until combined before adding the next. Do not over-mix. Divide the batter among the liners, filling each all the way to the top. (It’s OK if the crust is still warm.)
- Optional Water Bath: Boil a pot of water. You need 1 inch of water in your roasting pan for the water bath, so make sure you boil enough. Place a large metal baking or roasting pan on the bottom oven rack of the preheated oven. Pour boiling water into pan, about 1 inch deep. Immediately place the cheesecakes on the center rack. Close oven to trap the steam inside.
- Bake until the edges are set and the centers slightly jiggle when you tap the pan, about 20 minutes.
- Set the pan on a cooling rack and allow cheesecakes to cool at room temperature for 45 minutes, then transfer to the refrigerator and chill for at least 2 hours and up to 24 hours.
- Top the cheesecakes: Garnish with whipped cream, berries, mint, or other toppings suggested in recipe Notes.
- Cover and store leftover cheesecakes in the refrigerator for up to 5 days.

Leave a Reply