
Introduction to Fluffy Greek Pita Recipe
Are you a young professional balancing a busy schedule between work, life, and your love of good food? If so, then this fluffy Greek pita recipe is about to become your new best friend in the kitchen. Homemade pita not only tastes infinitely better than store-bought but also offers you the satisfaction of creating something delicious from scratch. Imagine sinking your teeth into a warm, fluffy pita that you've made yourself—it's a game changer.
Making your own pitas allows you to customize them to your taste and dietary needs, whether you’re using half whole wheat flour for added nutrients or opting for a dairy-free milk alternative. Plus, whipping up a batch is surprisingly quick and straightforward!
Did you know that baking at home can also save you money? According to a survey by the USDA, homemade bread and baked goods can cost up to 30% less than their pre-packaged counterparts. With just a few simple ingredients—flour, yeast, and water—you can create something much healthier and fresher.
So, are you ready to elevate your culinary skills and impress your friends? Let’s dive into this fluffy Greek pita recipe that promises to be a hit at any meal!
Ingredients for Fluffy Greek Pita
Essential ingredients for the dough
Creating the perfect fluffy Greek pita starts with these essential ingredients that truly bring the dough to life:
- 4 cups All-purpose flour: This is your main ingredient, crafting a chewy texture. For a twist, consider incorporating half whole wheat flour for added flavor and nutrition.
- 2 teaspoons Yeast: Fresh yeast is crucial; it’s what will make your pita rise beautifully!
- 1 teaspoon Salt: This not only enhances flavor but also regulates yeast activity, ensuring a perfect rise.
- 1 tablespoon Sugar: Helps with browning and activates your yeast for that perfect puff.
- 1 cup Milk: Provides necessary hydration; feel free to substitute with dairy-free options if you prefer.
- 1 cup Water: Essential for activating the yeast and ensuring your dough comes together.
- 2 tablespoons Olive oil: Adds a wonderful richness and moisture to keep your pitas soft.
Optional finishing touches
To elevate your fluffy Greek pita recipe, consider these optional finishing touches:
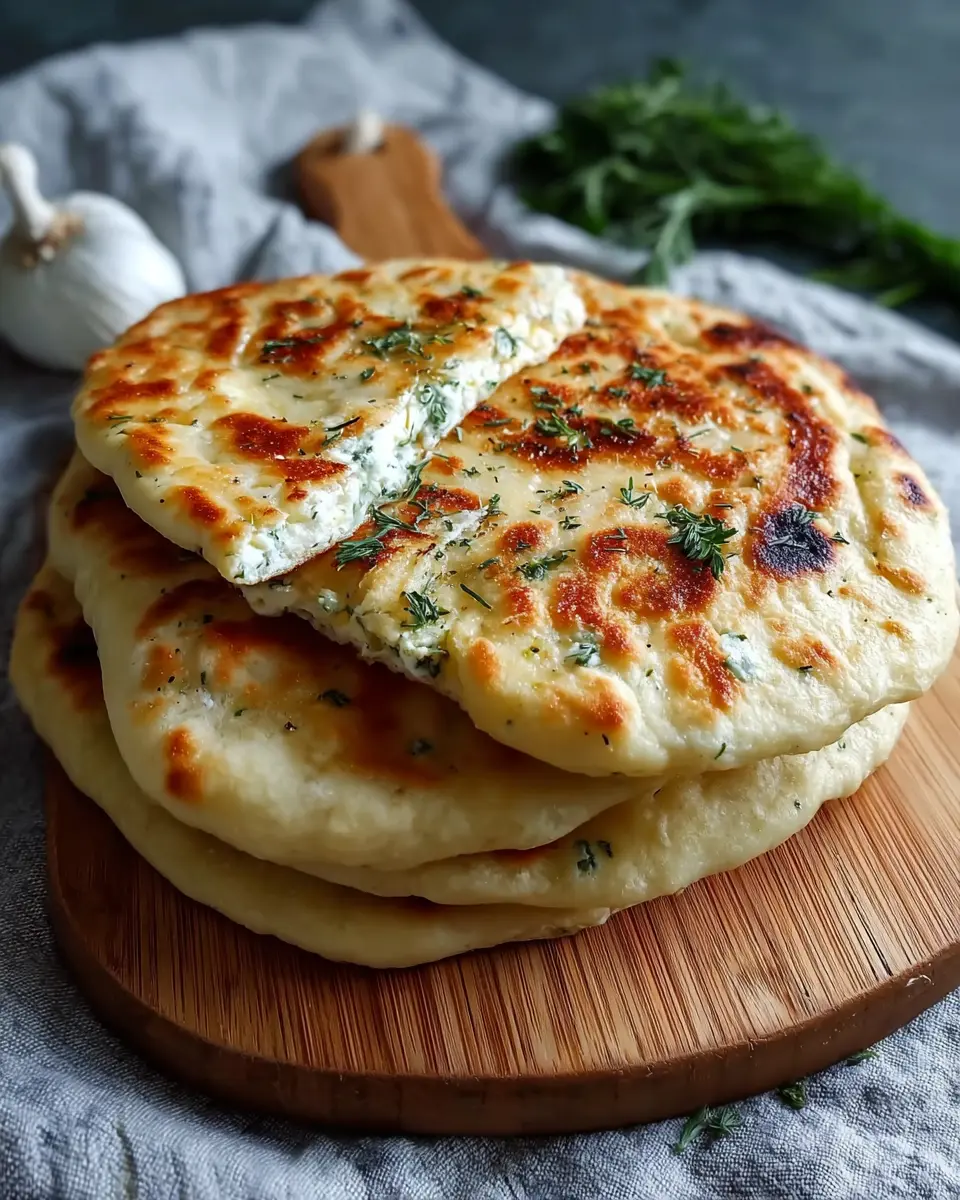
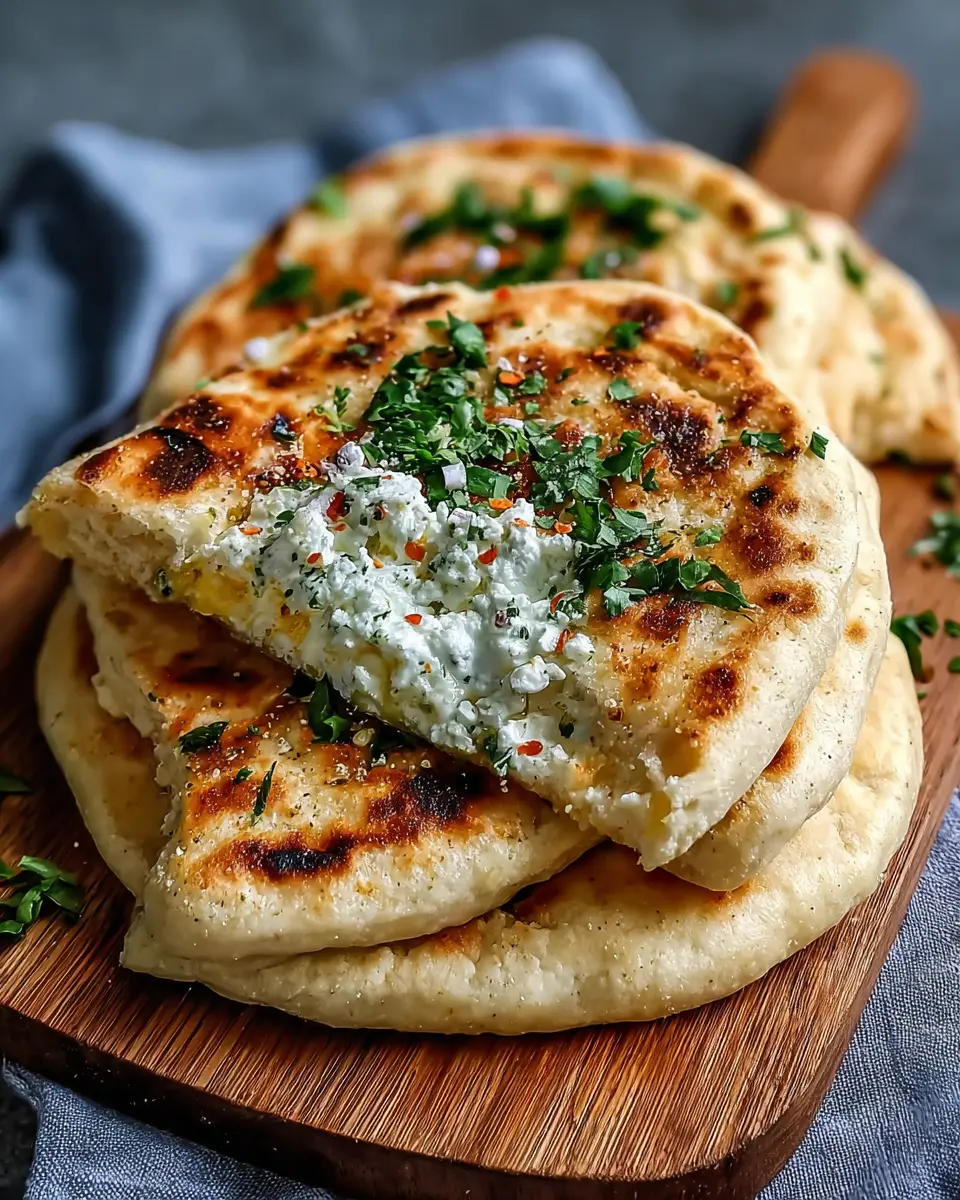
- 2 tablespoons Garlic butter: Brushing this on warm pitas adds a savory depth that makes them irresistible.
- 1 tablespoon Fresh parsley: Simply sprinkle on top for a pop of color and freshness.
These simple ingredients transform basic dough into a delightful accompaniment for any meal or snack. Happy cooking!
Step-by-step Preparation of Fluffy Greek Pita
Making your own fluffy Greek pita at home is not just a rewarding experience but also a delicious one! Follow these steps to craft perfectly soft and pillowy pitas that will impress your friends and family.
Mix the dry ingredients together
Start by gathering your ingredients. In a large bowl, whisk together 4 cups of all-purpose flour, 1 teaspoon of salt, and 1 tablespoon of sugar. The salt is essential for flavor and helps regulate the yeast activity, while sugar assists in browning the pitas. Make sure to use a good quality flour to ensure the best texture. If you're looking for a healthier alternative, consider substituting half of the all-purpose flour with whole wheat flour.
Activate the yeast
In a separate small bowl, mix 2 teaspoons of yeast with 1 cup of lukewarm milk and 1 cup of water. Let it sit for about 2-3 minutes until it becomes foamy—this indicates that your yeast is active. Using fresh yeast is crucial, as it ensures a good rise. You can learn more about yeast activation from sources like King Arthur Baking.
Combine the mixtures for the dough
Once your yeast is activated, pour it into the bowl with your flour mixture. Stir to combine until a shaggy dough forms. Add 2 tablespoons of olive oil at this stage, as it not only enriches the dough but also makes it easier to knead.
Knead the dough to perfection
Sprinkle a light dusting of flour on your work surface and transfer the dough. Knead it for about 8-10 minutes until it becomes smooth and elastic. This step develops the gluten, giving your pita that perfectly soft and fluffy texture.
Let the dough rise
Form the dough into a ball and place it in a lightly oiled bowl, then cover it with a clean kitchen towel. Let it rise in a warm area for about 1 hour, or until it doubles in size. This is where the magic happens; you’re creating those lovely air pockets that make pita bread so delightful.
Shape the pitas
After the dough has risen, punch it down to release the air. Divide it into 8 equal pieces and shape each piece into a ball. Roll out each ball into circles of about 7-8 inches in diameter on a floured surface. Aim for even thickness to ensure consistent cooking.
Cook the pitas in a skillet
Heat a skillet over medium-high heat and add a little olive oil to prevent sticking. Place each rolled-out pita in the skillet and cook for 1-2 minutes on each side until they puff up and turn golden brown. Watching that puff is one of the most satisfying parts of this process!
Add finishing touches with garlic butter
For the grand finale, brush your warm pitas with 2 tablespoons of garlic butter. This extra step infuses flavor and takes your pitas to a whole new level. Serve them warm alongside a fresh Greek salad, or use them to scoop up your favorite dips.
Now you’re ready to enjoy your homemade fluffy Greek pitas! Whether as a side dish or a base for delightful toppings, these pitas will surely elevate your meal. Happy cooking!
Variations for Fluffy Greek Pita
Whole Wheat Pita Option
Looking for a healthier twist on the classic fluffy Greek pita recipe? Opt for whole wheat flour! By substituting half of the all-purpose flour with whole wheat flour, you’ll create pitas that are just as fluffy but boast a nuttier flavor and added fiber. This simple change not only enhances the nutritional profile but also keeps the beloved texture intact.
Flavored Pitas with Herbs
Want to spice things up? Experiment with adding herbs such as rosemary, oregano, or dill directly into your dough. A tablespoon or two will infuse your pitas with delightful aromas and flavors, perfect for pairing with your favorite dips or Mediterranean dishes. Plus, it’s a great way to impress friends at gatherings. Imagine the compliments you’ll receive!
For more details on making the most out of your pita experience, check out this guide on Mediterranean flavors!
Cooking Tips and Notes for Fluffy Greek Pita
Tips for perfect texture and flavor
For the ultimate fluffy Greek pita recipe, keep these pointers in mind:
- Use Fresh Yeast: Always check the expiration date on your yeast. Fresh yeast is crucial for a good rise.
- Knead Properly: Don’t rush this step! Knead until the dough is smooth and elastic to develop gluten, which creates a light texture.
- Rise in a Warm Space: Find a cozy spot for your dough to rise—this dramatically impacts the fluffiness of your pitas.
Troubleshooting common pita problems
If your pitas aren’t puffing up as expected, don’t worry! Here’s how to troubleshoot:
- Dough Too Cold: Make sure your ingredients are at room temperature to activate the yeast effectively.
- Overcooking: If your pitas are too tough, reduce cooking time and ensure your skillet is properly heated.
- Thickness: Roll your dough evenly. Uneven thickness can affect how well they puff up.
Following these tips should lead to delightful, airy pockets perfect for filling and dipping! For more detailed guidance on cooking techniques, check out resources from Serious Eats or America's Test Kitchen.
Serving Suggestions for Fluffy Greek Pita
What to Serve with Pita
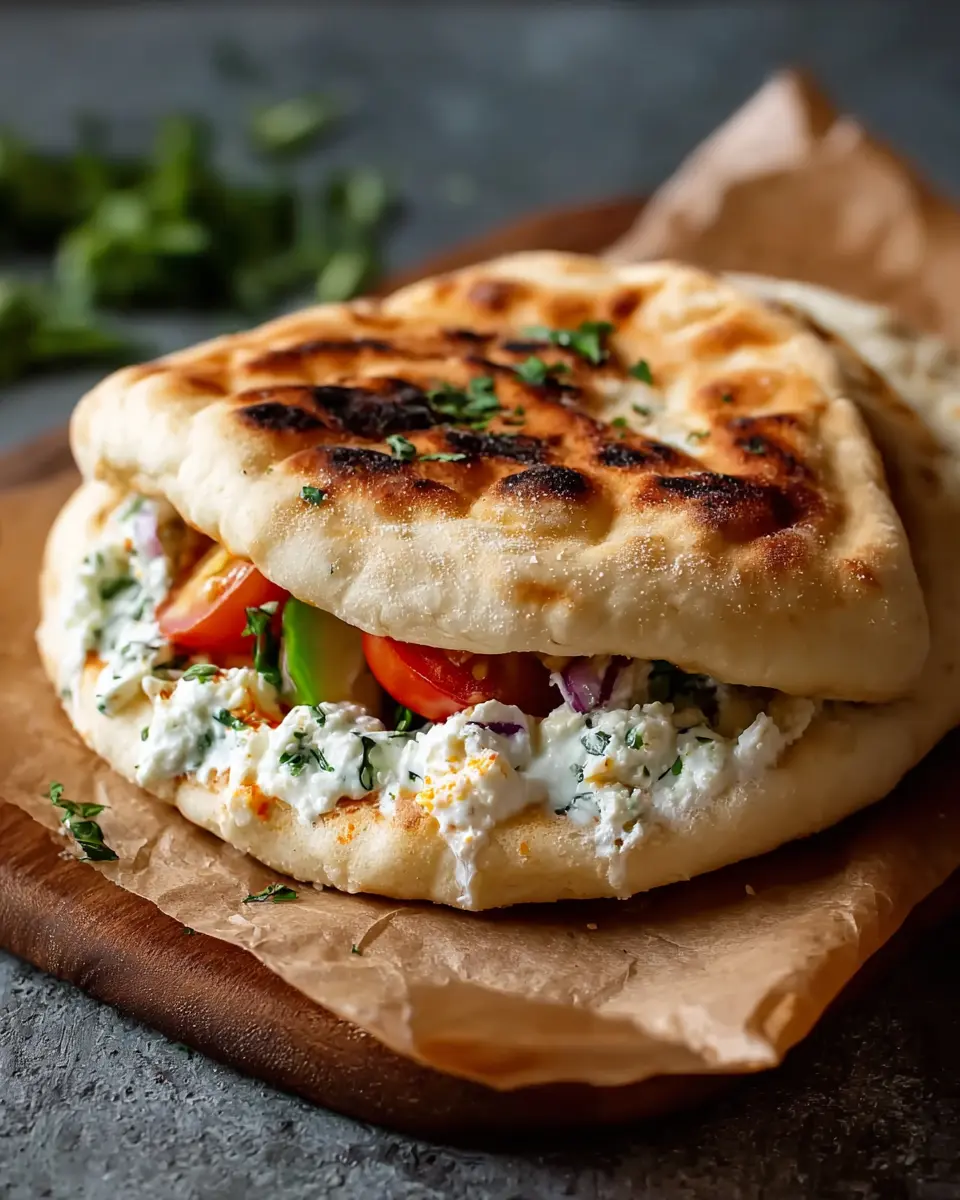
These fluffy Greek pitas are a versatile delight! Pair them with hummus, tzatziki, or a hearty baba ganoush for an easy appetizer. You can also fill them with your favorite proteins like grilled chicken or turkey bacon, layered with fresh vegetables and a drizzle of tangy yogurt sauce. For something substantial, consider turning them into delicious pocket sandwiches loaded with Mediterranean flavors.
Creative Uses for Leftovers
If you have any leftover pitas, don’t let them go to waste! Slice them into triangles and toss them in the oven for homemade pita chips, perfect for snacking. They can also be used to scoop up stews or soups, adding a nice touch of flavor and texture. Another idea is to stuff them with breakfast fillings like scrambled eggs and spinach for a nutritious start to your day! Enjoy experimenting with these delicious ideas.
Time Breakdown for Fluffy Greek Pita
Preparation time
Get things rolling in about 15 minutes as you mix your ingredients and knead your dough.
Rising time
Patience pays off! Let your dough rise for roughly 1 hour. This step is key for that enticing puffiness.
Cooking time
Each pita takes around 2-3 minutes to cook. A swift flip and they'll be golden and delightful.
Total time
In total, you’re looking at about 1 hour and 20 minutes from start to finish for the fluffy Greek pita recipe. Perfect for a quick dinner or snack!
For more detailed guidance, check out resources from King Arthur Baking or Serious Eats for tips on bread-making.
Nutritional Facts for Fluffy Greek Pita
Calories per pita
Each fluffy Greek pita packs approximately 150 calories, making it a reasonable choice for a light meal or snack. This balance allows you to indulge without feeling guilty, perfect for any diet or lifestyle!
Macronutrients breakdown
The macronutrient composition of this delightful pita includes:
- Carbohydrates: 30g
- Protein: 5g
- Fat: 2g
- Monounsaturated Fat: 2g
- Fiber: 2g
- Sugar: 1g
With a modest amount of sugar and a good dose of fiber, this fluffy Greek pita recipe can be a nourishing addition to your meals. For more insights on how pita compares to other flatbreads, check out this health guide.
FAQs about Fluffy Greek Pita
How do I store leftover pita?
Leftover fluffy Greek pita can be easily stored! Allow them to cool completely, then place them in a zippered plastic bag or an airtight container. For best results, keep them at room temperature if you'll use them within a couple of days. If you anticipate keeping them longer, consider freezing them.
Can I freeze the pitas?
Absolutely! To freeze your pitas, stack them with parchment paper in between (to prevent sticking), and place them in a freezer-safe bag. They'll stay fresh for up to three months. When you're ready to enjoy them, simply thaw them in the refrigerator or reheat directly in a skillet.
What can I do if my pitas don’t puff up?
If your pitas don’t puff up, it could be due to a few reasons. Ensure your yeast is fresh and properly activated. Cooking at the right temperature is crucial; too low might prevent puffing. Lastly, don't roll them too thin—aim for about ¼ inch to allow sufficient space for puffing. You can find more tips on yeast baking here. Happy baking!
Conclusion on Fluffy Greek Pita Recipe
In conclusion, this fluffy Greek pita recipe brings a delightful taste of Greece straight to your kitchen. With a simple method and wholesome ingredients, you'll be enjoying your homemade pitas in no time. Pair them with fresh dips or use them for delicious wraps. Happy baking!

Fluffy Greek Pita Recipe
Equipment
- large bowl
- Small bowl
- Skillet
- floured surface
Ingredients
For the Dough
- 4 cups All-purpose flour For a chewier pita, try using half whole wheat flour.
- 2 teaspoons Yeast Ensure your yeast is fresh for the best outcome.
- 1 teaspoon Salt Enhances flavor and helps regulate yeast activity.
- 1 tablespoon Sugar Aids in browning and activates the yeast.
- 1 cup Milk Hydrates the dough; substitute with dairy-free if desired.
- 1 cup Water Integral to activate the yeast.
- 2 tablespoons Olive oil Adds richness and moisture.
For the Optional Finishing Touches
- 2 tablespoons Garlic butter Brush on warm pitas for extra flavor.
- 1 tablespoon Fresh parsley For garnish.
Instructions
How to Make Fluffy Greek Pita
- In a large bowl, mix together all-purpose flour, salt, and sugar. In a separate small bowl, combine lukewarm milk and yeast, letting it sit until foamy (2-3 minutes).
- Stir the yeast mixture into the flour mixture until a shaggy dough forms. Add olive oil and combine well to bring your dough together.
- On a floured surface, knead the dough for 8-10 minutes until smooth and elastic.
- Place the kneaded dough in a lightly oiled bowl, cover it with a clean towel, and let it rise in a warm area for about 1 hour, or until doubled.
- Once risen, punch down the dough, divide it into 8 equal pieces, and shape them into balls. Roll each ball into circles about 7-8 inches in diameter.
- Heat a skillet over medium-high heat and add a little olive oil. Cook each pita for 1-2 minutes on one side until puffed and golden, then flip and repeat.
- Brush warm pitas with garlic butter for extra flavor. Serve immediately.


Leave a Reply